How to Use NodeMaven Scraping Browser: Step-by-Step Guide



NodeMaven Scraping Browser lets you run a real cloud browser for web scraping and website automation. You can start with a ready-made template, edit a Playwright or Puppeteer script, use Vanilla JavaScript, or describe the workflow in plain language with an AI prompt.
Each browser session runs with NodeMaven proxies, managed anti-detection, CAPTCHA solving, reusable browser profiles, Live Browser, console output, and session recordings already built in.
Nowadays, web automation runs in a stricter environment. According to the Imperva 2026 Bad Bot Report, automated systems generated more than 53% of all web traffic in 2025. Websites respond by checking browser behaviour, IP reputation, session history, location signals, and automation patterns more closely.
NodeMaven Scraping Browser is built for workflows where a simple HTTP request is not enough: dynamic pages, filters, forms, local search results, e-commerce pages, real estate listings, price monitoring, and AI-assisted data extraction.
What is NodeMaven Scraping Browser?
NodeMaven Scraping Browser is a managed cloud browser for scraping and browser automation. It can navigate pages, click elements, complete forms, extract structured data, save screenshots, and help debug the workflow directly in the dashboard.
You can run automations with Playwright, Puppeteer, Vanilla JavaScript, or AI Prompt. The browser runs on NodeMaven infrastructure and uses NodeMaven proxy settings, so the browser location, timezone, locale, geolocation, and network behaviour stay aligned with the selected proxy location.
Scraping Browser also includes Extra Stealth, CAPTCHA Solver, Cloudflare Web Bot Auth, Ad Blocker, browser profiles, Live Browser, execution logs, structured results, files, screenshots, and session recordings.
Access is available to customers with an active NodeMaven Rotating Residential Proxy subscription. There is no separate browser runtime fee. Users pay only for NodeMaven proxy traffic transferred during browser sessions.

Best way to start: Quick Start, AI Prompt, or code
Choose the starting point based on your workflow.
- Quick Start: best for the first test. It runs a ready-made template with an example target URL, so you can see the browser, script, console, and output before editing anything.
- AI Prompt: best if you are not a developer. Describe the target page, the actions, and the fields you want to collect in plain language.
- Playwright, Puppeteer, or Vanilla JS: best if you want control over selectors, waits, navigation, screenshots, files, and structured results.
- Customize browser: best when the workflow needs a specific proxy location, ZIP targeting, sticky sessions, reusable profiles, CAPTCHA solving, or advanced browser settings.
- API: best after the workflow works in Playground and needs to run from your backend, queue, cron job, scheduler, or production automation stack.
Scraping Browser is also a better starting point than a simple HTTP scraper when the target page is JavaScript-heavy, requires clicks or form interactions, or returns different content by location. For Cloudflare-protected pages, enable Extra Stealth, CAPTCHA Solver, and Cloudflare Web Bot Auth where applicable.
If the scraped data goes into an AI or RAG pipeline, return structured JSON from the automation and pass it into your database, vector index, enrichment workflow, or storage layer.
Step 1: Start from the Overview tab
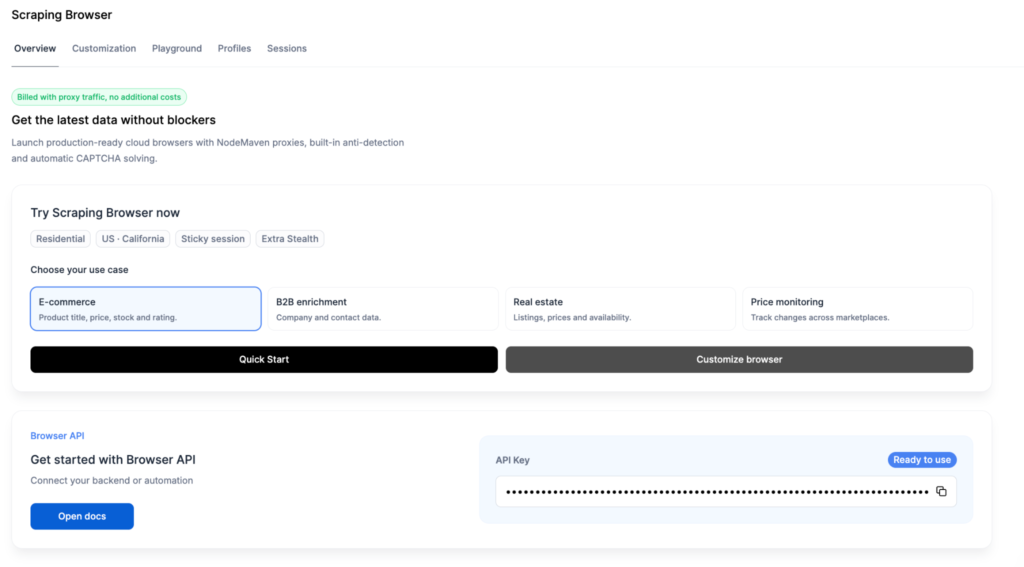
When you open Scraping Browser in the NodeMaven dashboard, the Overview tab opens first.
The first screen gives you four ready-made templates: E-commerce, B2B enrichment, Real estate, and Price monitoring. Each template has a prepared script and example target URL, so you can run a working browser automation before building your own.
For a first test, select one template and press Quick Start. The dashboard opens Playground and starts the prepared script.
Watch this first run before changing the target URL or proxy settings. You will see how Scraping Browser opens the page, runs the script, prints console output, and returns structured results.
Step 2: Watch the template run in Playground
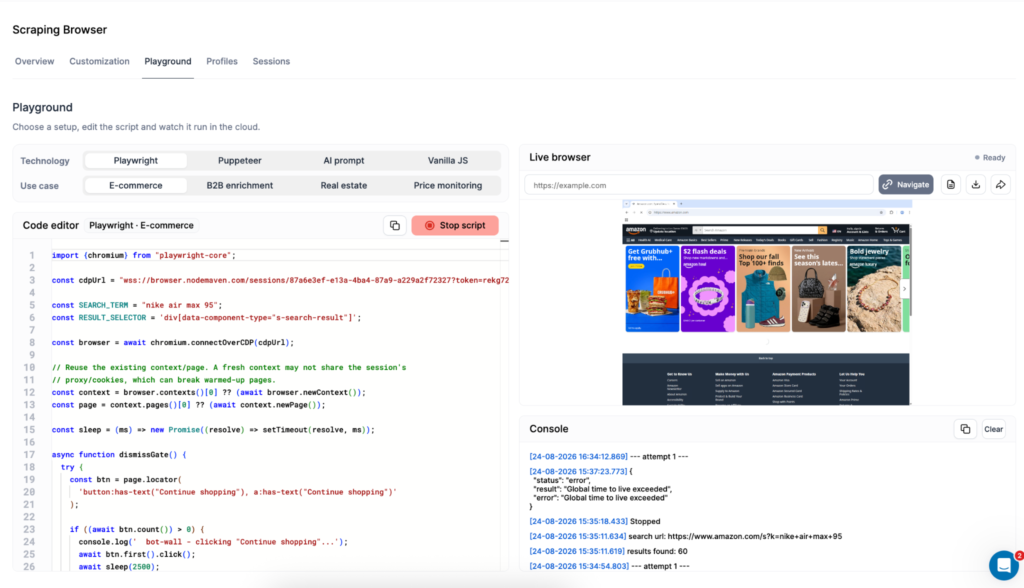
After you press Quick Start, the Playground tab opens and the template script starts running.
The left side contains the script editor, technology switcher, and use-case switcher. The right side shows the Live Browser, where you can watch the automation as it runs.
During the run, you can inspect console output, follow automation steps, review structured results, generate files, save screenshots, stop the script, navigate the scraped page, download the page as HTML, or open the browser in a larger tab.
The Live Browser makes debugging much easier. If the wrong page loads, a selector misses an element, or the website shows a verification screen, you can see the problem directly instead of trying to interpret a failed JSON response.
Step 3: Edit the script or use an AI prompt
Playground gives you two ways to build the automation: code or a plain-language prompt.
For developers: edit Playwright, Puppeteer, or Vanilla JS
Developers can switch between Playwright, Puppeteer, and Vanilla JS. You can also select one of the four use-case templates and edit it for your own target page.
Most edits are simple at first. Replace the example URL, change the search term, adjust selectors, or change which fields are returned. For an e-commerce page, that might mean collecting product names, prices, ratings, stock status, and product URLs. For a real estate page, it might mean extracting listing URLs, prices, addresses, and availability.
If you already use browser automation locally, Scraping Browser gives you a cloud environment with proxy routing, fingerprint settings, CAPTCHA handling, Live Browser, and recordings in the same workflow. NodeMaven also has separate guides for Playwright proxy setup and Puppeteer proxy setup if you want to compare local and cloud setups.
For no-code users: use AI Prompt
The AI Prompt tab lets you describe the workflow in plain language.
Example prompt:
After writing the prompt, press Run prompt. The browser starts working on the right side of the screen, and the result comes back as structured JSON.
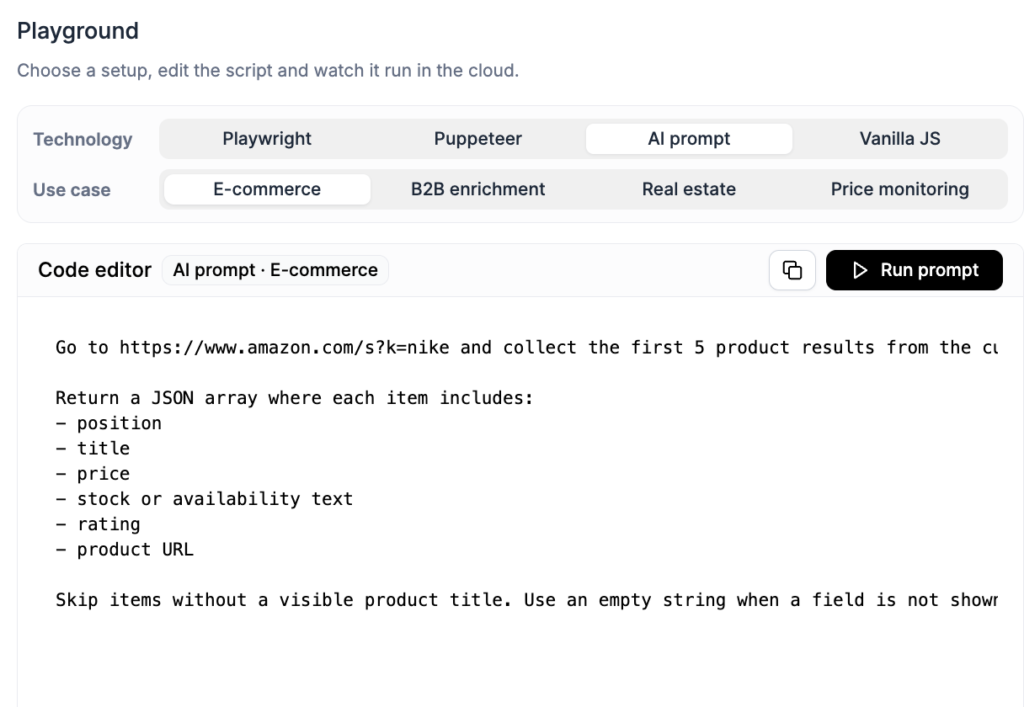
AI Prompt works best with specific instructions. Include the target URL, the action sequence, the number of results, and the exact fields you want.
Step 4: Customise proxy, profile, and browser settings
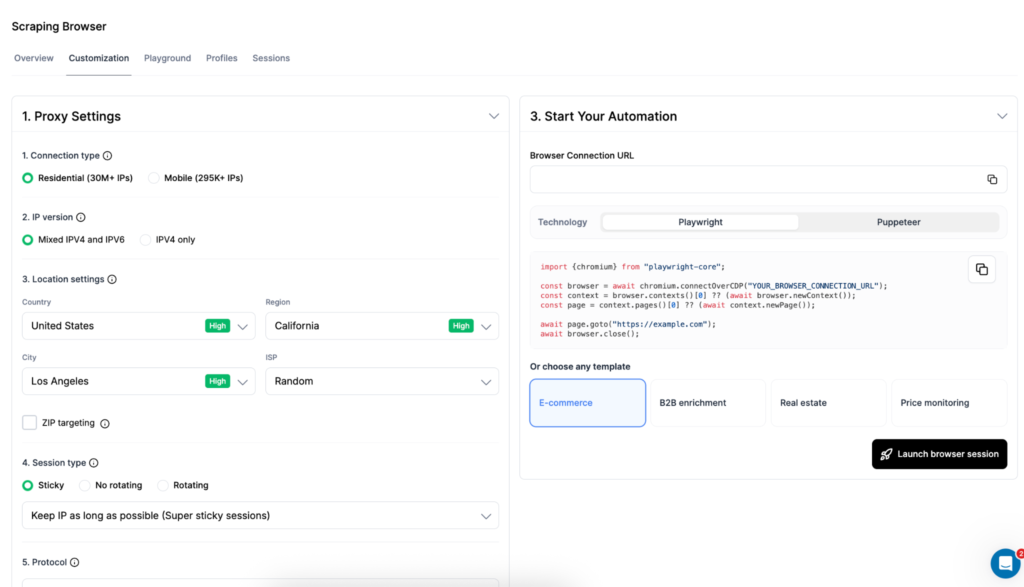
Use Customise browser when the default Quick Start setup needs more control. You can open it from the Overview tab or go directly to the Customization tab.
This is where you prepare the browser environment before launching a session.
Proxy location and rotation
Scraping Browser works exclusively with NodeMaven proxies. Before launching the browser, you can choose whether the session should use residential or mobile traffic, whether IPv4 only or mixed IPv4/IPv6 should be allowed, and which location the browser should appear from.
Location controls include country, region, city, ISP, and ZIP-level targeting. Session behavior can be sticky, rotating, or non-rotating.
For local scraping, these settings shape what the website returns. If you scrape Amazon, Zillow, or local listings in Los Angeles, you can choose United States → California → Los Angeles or narrow the location with ZIP targeting. This helps the browser see local prices, listings, availability, delivery options, and regional page versions more consistently.
Use residential proxies for most public web scraping and location-specific browsing. Use mobile proxies when the workflow needs carrier-network traffic or mobile-like access patterns.
For session behaviour, match the setting to the page flow. Rotating sessions fit independent pages where each page can be collected separately. Sticky sessions fit pagination, filters, cookies, login state, and saved location settings. No rotation fits a single browser run where the IP should stay fixed until the session ends.
Browser profile settings
A browser profile saves browser state between sessions. It can preserve cookies, local storage, cache, browser history, and authenticated website state.
A reusable profile helps maintain the same browser identity across multiple runs, as long as the website’s own login session remains valid.
For example, a price monitoring workflow may reuse the same profile to keep location preferences, filters, or session cookies. A B2B enrichment workflow may use a profile to avoid resetting the same portal settings before every run.
Browser protections
Scraping Browser includes several browser-level controls that can be adjusted before the session starts.
Extra Stealth manages fingerprint and anti-detection settings. CAPTCHA Solver handles supported CAPTCHA challenges. Cloudflare Web Bot Auth signs requests for participating Cloudflare websites. Ad Blocker blocks ads and unnecessary resources, which can reduce page weight and lower unnecessary traffic use.
This setup replaces several separate tools that teams often connect manually: proxy provider, fingerprint layer, CAPTCHA solver, browser runner, logging tool, and screenshot debugger.
Advanced browser settings
Advanced settings cover browser mode, popup behaviour, session duration, and idle timeout.
Use headful mode when you are debugging because you can see what the browser does. Use headless mode when the workflow is already stable and does not need visual inspection.
Each browser session has a maximum TTL of 30 minutes. If your workflow needs more time, split it into smaller runs.
Step 5: Launch the browser session
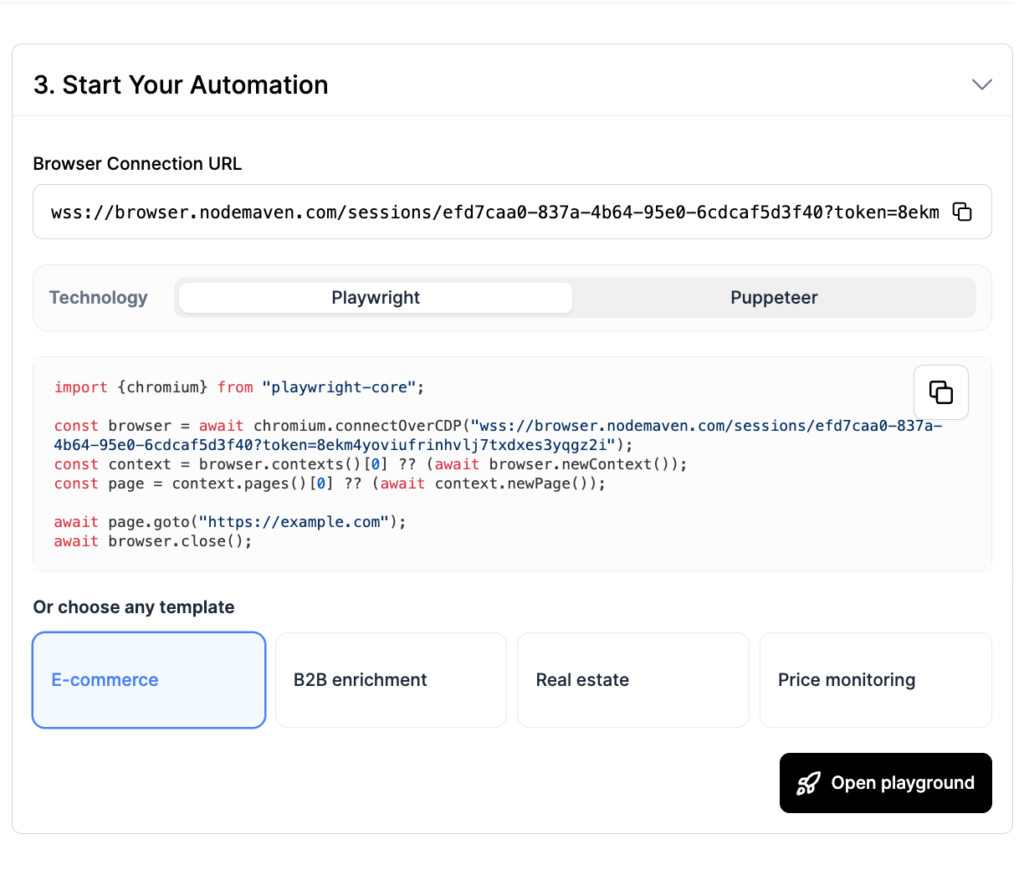
After the settings are ready, choose Playwright or Puppeteer, or select one of the four templates. Then press Launch browser session.
NodeMaven creates the configured browser session and returns a Browser Connection URL.
Developers can copy that URL and connect to the running browser through CDP using Playwright or Puppeteer. Users who want to keep testing in the dashboard can press Open Playground and run the configured session there.
This step connects dashboard setup with production automation. You can test the browser visually, confirm the proxy and browser settings, then reuse the connection URL in your own code.
Step 6: Use profiles for repeat workflows
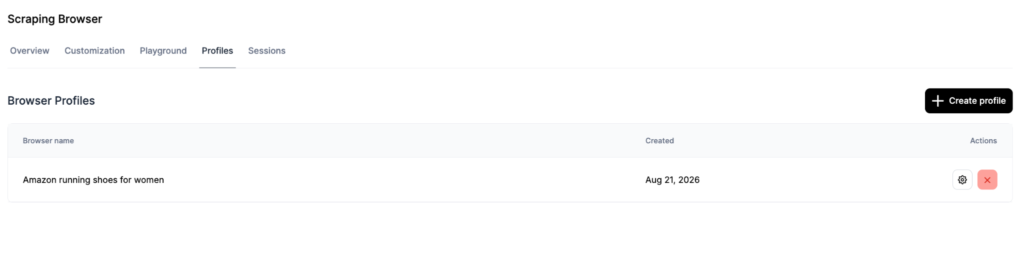
Profiles are for workflows that should remember browser state across sessions.
Open the Profiles tab and press Create profile. Add a name and description, then choose whether the profile should store browser cache. You can also pin the location from the first session.
Profiles fit recurring price monitoring, logged-in dashboards, marketplace checks, B2B portals, and real estate searches with saved filters.
Each account includes up to 10 browser profiles by default.
A profile is different from a session. A session is one browser run with a maximum TTL of 30 minutes. A profile stores browser state that can be reused across multiple sessions.
Step 7: Review and debug sessions
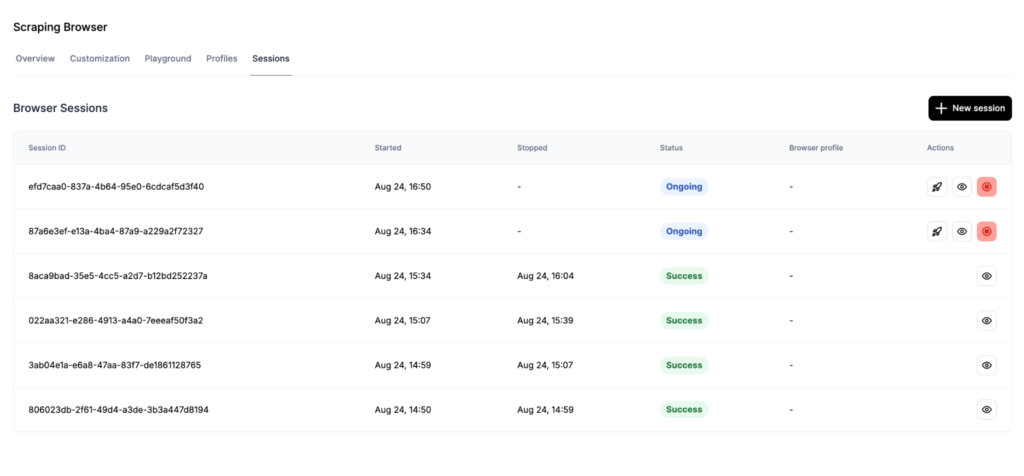
The Sessions tab shows active and completed browser runs.
From this page, you can review session status, terminate an active session manually, open session details, watch session recordings, and debug completed automations.
The statuses are straightforward. Ongoing means the session is still running. Success means the automation completed. Failed means the automation ended with an error or did not complete.
Each browser session has a maximum TTL of 30 minutes. Session recordings and debugging data are retained for 3 days.
If an automation gets stuck, open the session, check Live Browser or the recording, stop the run, update the script or prompt, and start a new session.
Dashboard vs API: when to use each
Use the dashboard while the workflow is still being built. It is the easiest place to test templates, write AI prompts, debug selectors, watch Live Browser, check console output, and review JSON, files, or screenshots.
Use the API after the workflow works in Playground and needs to run from your backend, scheduler, or production automation system.
For scheduled jobs and cloud execution, connect Scraping Browser to your backend, queue, cron job, or scheduler through the API. The browser sessions run in the cloud, while your system controls when to start a session, what target to open, and how to process the returned data.
The API key is available on the Overview page. Applications can connect to a running browser over CDP using Playwright or Puppeteer.
A clean workflow usually looks like this:
- Test the automation in Playground.
- Customise proxy and browser settings.
- Confirm the output.
- Move the working flow to the API.
This keeps production code cleaner because the dashboard already shows most scraping problems before integration starts.
Pricing and limits
NodeMaven Scraping Browser has no separate browser usage fee. Customers pay only for NodeMaven rotating proxy traffic transferred during browser sessions.
That means browser runtime, Live Browser, AI prompts, CAPTCHA solving, and session recordings have no separate charge.
If you are testing NodeMaven for the first time, you can start with 750 MB of residential and mobile proxy traffic for $3.50. After that, rotating residential and mobile proxy plans start from $2.20/GB.
Users can monitor traffic in Dashboard → Breakdown by domain → Scraping Browser. There is currently no configurable traffic cap for a single session, but active sessions can be terminated manually at any time.
Default limits:
| Limit | Included by default |
| Browser profiles | Up to 10 |
| Active browser sessions | Up to 50 at the same time |
| Maximum session TTL | 30 minutes |
| Recording retention | 3 days |
Best use cases for NodeMaven Scraping Browser
Scraping Browser fits workflows where the website needs a real browser, consistent location, interaction, or visual debugging.
E-commerce scraping
E-commerce pages often use JavaScript, filters, popups, location settings, product cards, and dynamic pricing blocks.
NodeMaven’s Scraping Browser can collect product titles, prices, stock status, ratings, product URLs, and screenshots from rendered pages. For related workflows, see NodeMaven’s guides to price scraping and Amazon scraping.
B2B enrichment
B2B enrichment workflows often involve search boxes, filters, directory pages, profile pages, and structured extraction.
Scraping Browser can navigate public company directories, collect visible company fields, and return structured JSON. An AI Prompt can also help non-developers describe the extraction flow without manually writing selectors.
Real estate scraping
Real estate websites often change results by location, filters, map view, ZIP code, and listing availability.
Scraping Browser can collect listings, prices, addresses, availability, and local search results. For local workflows, ZIP targeting helps the browser see the correct regional page version.
Price monitoring
Price monitoring needs consistency. If a website stores location, currency, delivery options, or filters, the automation should avoid random location changes. Use sticky sessions or a reusable browser profile when the same workflow runs repeatedly.
AI and RAG data collection
Scraping Browser can return structured JSON, files, screenshots, and extracted page data. That makes it a practical fit for AI workflows where scraped web data needs to move into a database, vector index, enrichment pipeline, or RAG system.
For these workflows, keep the browser run focused: collect the page, extract the fields, validate the output, and send clean structured data downstream.
Common issues and fixes
The page shows the wrong location
Check country, region, city, ZIP targeting, browser profile, and proxy session settings.
If the website stores location in cookies, reuse the right browser profile or clear the old state before testing a new region.
The automation gets stuck
Open Live Browser and check the console output. If the browser waits on the wrong element, gets stuck behind a popup, or loads a page slowly, stop the session, edit the script or prompt, and rerun.
Completed sessions can also be reviewed through recordings.
Login state disappears
Use a persistent browser profile. Profiles can preserve cookies, local storage, cache, browser history, and authenticated website state.
If login still disappears, the website’s own session may have expired or invalidated the login.
CAPTCHA keeps appearing
Keep CAPTCHA Solver enabled, then check proxy quality, request speed, session behaviour, and website restrictions.
CAPTCHA solving handles supported challenges, but repeated CAPTCHA prompts usually mean the workflow needs slower actions, better session continuity, or a different proxy configuration.
Traffic usage is higher than expected
Large pages, images, videos, ads, retries, and stuck sessions can increase traffic. Use Ad Blocker where suitable and terminate stuck sessions manually.
Check usage in Dashboard → Breakdown by domain → Scraping Browser to see total and domain-level traffic.
Conclusion
NodeMaven Scraping Browser is easiest to test from the dashboard. Start with Quick Start, watch the template run in Playground, then edit the script or switch to AI Prompt for a no-code workflow.
Use Customization when the workflow needs a specific location, sticky session, browser profile, CAPTCHA solving, or advanced browser settings. Once the automation returns the right JSON, files, or screenshots, move it to production through the API and connect with Playwright or Puppeteer.
For teams already using NodeMaven proxies, Scraping Browser removes a lot of setup work. Browser runtime, AI prompts, CAPTCHA solving, Live Browser, and recordings are included. You pay only for proxy traffic used during browser sessions.