
Как использовать NodeMaven Scraping Browser: пошаговое руководство



NodeMaven Scraping Browser позволяет запускать настоящий облачный браузер для веб-скрейпинг и автоматизации сайтов. Можно начать с готового шаблона, отредактировать скрипт на Playwright или Puppeteer, использовать чистый JavaScript или описать сценарий обычными словами в AI-промпте.
Каждая сессия браузера запускается с прокси NodeMaven, управляемой антидетект-защитой, решением CAPTCHA, многоразовыми профилями браузера, Live Browser, выводом консоли и записями сессий уже из коробки.
Сегодня веб-автоматизация работает в более жёстких условиях. Согласно Отчет Imperva о плохих ботах 2026, автоматизированные системы сгенерировали более 53% всего веб-трафика в 2025 году. Сайты в ответ внимательнее проверяют поведение браузера, репутацию IP, историю сессии, сигналы местоположения и признаки автоматизации.
браузер для скрапинга NodeMaven создан для задач, где простого HTTP-запроса недостаточно: динамические страницы, фильтры, формы, локальная выдача, страницы интернет-магазинов, объявления о недвижимости, мониторинг цен и извлечение данных с помощью AI.
Что такое NodeMaven Scraping Browser?
NodeMaven Scraping Browser — это управляемый облачный браузер для скрапинга и автоматизации браузера. Он умеет переходить по страницам, кликать по элементам, заполнять формы, извлекать структурированные данные, сохранять скриншоты и помогать отлаживать рабочий процесс прямо в дашборде.
Вы можете запускать автоматизации с помощью Playwright, Puppeteer, чистого JavaScript или AI-промпта. Браузер работает на инфраструктуре NodeMaven и использует настройки прокси NodeMaven, поэтому местоположение браузера, часовой пояс, локаль, геолокация и сетевое поведение соответствуют выбранной локации прокси.
Scraping Browser также включает Extra Stealth, Сервис решения CAPTCHA, Cloudflare Web Bot Auth, Ad Blocker, профили браузера, Live Browser, логи выполнения, структурированные результаты, файлы, скриншоты и записи сессий.
Доступ открыт клиентам с активной Ротируемый резидентный прокси NodeMaven подпиской. Отдельной платы за среду выполнения браузера нет. Вы платите только за трафик прокси NodeMaven израсходованный во время сессий браузера.

С чего лучше начать: Quick Start, AI Prompt или код
Выберите отправную точку в зависимости от вашего рабочего процесса.
- Quick Start: лучший вариант для первого теста. Запускается готовый шаблон с примером целевого URL, поэтому вы увидите браузер, скрипт, консоль и результат ещё до внесения каких-либо правок.
- AI Prompt: лучший вариант, если вы не разработчик. Опишите обычными словами целевую страницу, действия и поля, которые нужно собрать.
- Playwright, Puppeteer или Vanilla JS: лучший вариант, если вам нужен контроль над селекторами, ожиданиями, навигацией, скриншотами, файлами и структурированными результатами.
- Настройка браузера: лучший вариант, когда рабочему процессу нужна конкретная локация прокси, таргетинг по ZIP-коду, sticky-сессии, переиспользуемые профили, решение CAPTCHA или расширенные настройки браузера.
- API: лучший вариант после того, как процесс отработал в Playground и его нужно запускать из вашего бэкенда, очереди, cron-задачи, планировщика или продакшн-стека автоматизации.
Scraping Browser также подходит лучше простого HTTP-скрапера, когда целевая страница активно использует JavaScript, требует кликов или взаимодействия с формами либо отдаёт разный контент в зависимости от локации. Для страниц под защитой Cloudflare включайте Extra Stealth, Сервис решения CAPTCHA, и Cloudflare Web Bot Auth там, где это применимо.
Если собранные данные идут в AI- или RAG-пайплайн, возвращайте из автоматизации структурированный JSON и передавайте его в вашу базу данных, векторный индекс, процесс обогащения данных или хранилище.
Шаг 1: начните с вкладки Overview
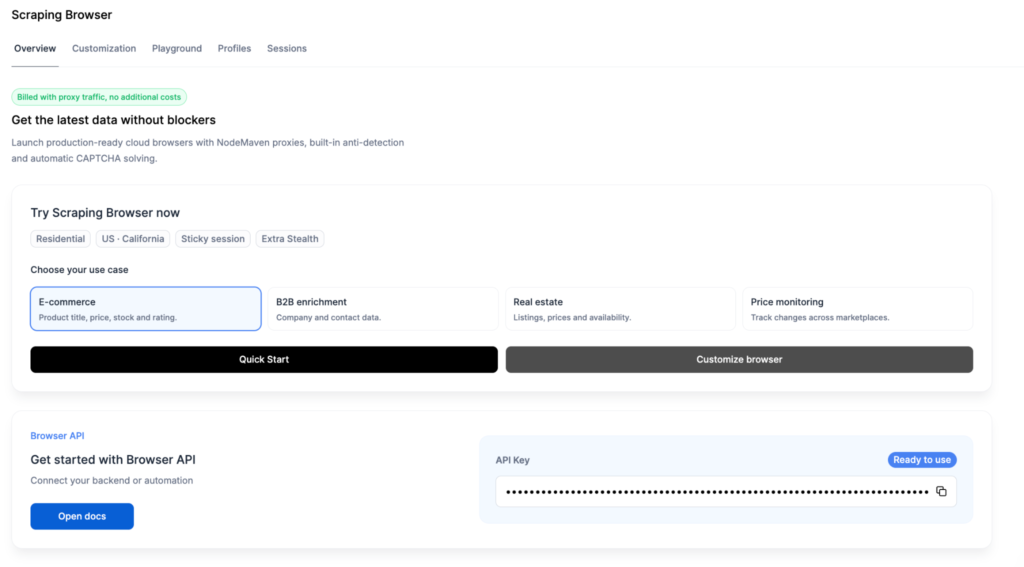
Когда вы откройте Scraping Browser в панели управления NodeMaven, то Обзор открывается первой.
На первом экране доступны четыре готовых шаблона: E-commerce, Обогащение B2B-данных, Недвижимость, и Мониторинг цен. В каждом шаблоне есть готовый скрипт и пример целевого URL, поэтому вы можете запустить рабочую автоматизацию браузера ещё до создания собственной.
Для первого теста выберите один шаблон и нажмите Быстрый старт. Панель управления откроет Playground и запустит подготовленный скрипт.
Понаблюдайте за этим первым запуском, прежде чем менять целевой URL или настройки прокси. Вы увидите, как Scraping Browser открывает страницу, выполняет скрипт, выводит данные в консоль и возвращает структурированные результаты.
Шаг 2: посмотрите, как шаблон работает в Playground
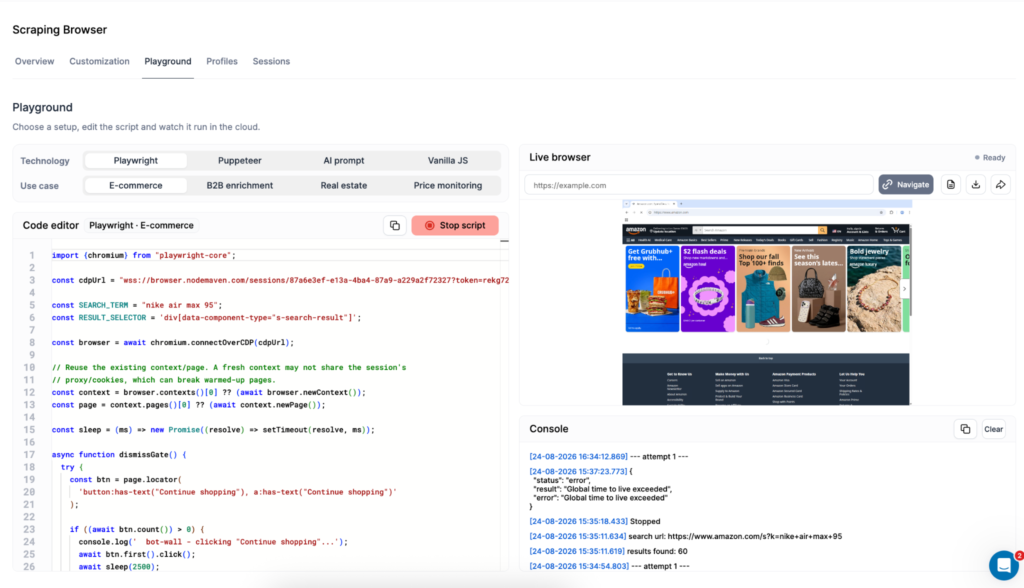
После нажатия Быстрый старт, то Playground открывается вкладка, и скрипт шаблона начинает выполняться.
Слева расположены редактор скрипта, переключатель технологий и переключатель сценариев использования. Справа отображается Live Browser, где можно наблюдать за автоматизацией в реальном времени.
Во время выполнения вы можете просматривать вывод консоли, следить за шагами автоматизации, изучать структурированные результаты, генерировать файлы, сохранять скриншоты, останавливать скрипт, перемещаться по собираемой странице, скачивать страницу в HTML или открыть браузер в отдельной большой вкладке.
Live Browser значительно упрощает отладку. Если загрузилась не та страница, селектор не нашёл элемент или сайт показал экран проверки, вы увидите проблему напрямую, вместо того чтобы разбирать неудачный JSON-ответ.
Шаг 3: отредактируйте скрипт или используйте AI-промпт
Playground предлагает два способа собрать автоматизацию: код или запрос на обычном языке.
Для разработчиков: редактируйте Playwright, Puppeteer или Vanilla JS
Разработчики могут переключаться между Playwright, Puppeteer, и Vanilla JS. Также можно выбрать один из четырёх шаблонов под типовые сценарии и адаптировать его под свою целевую страницу.
Поначалу правки простые. Замените URL из примера, измените поисковый запрос, подправьте селекторы или выберите, какие поля возвращать. Для страницы интернет-магазина это может быть сбор названий товаров, цен, рейтингов, наличия и URL товаров. Для страницы с недвижимостью — извлечение URL объявлений, цен, адресов и доступности.
Если вы уже используете автоматизацию браузера локально, Scraping Browser даёт облачную среду с маршрутизацией через прокси, настройками отпечатка, обработкой CAPTCHA, Live Browser и записями сессий в одном рабочем процессе. У NodeMaven также есть отдельные руководства по Настройка прокси в Playwright и Настройка прокси в Puppeteer если вы хотите сравнить локальную и облачную конфигурации.
Для тех, кто не пишет код: используйте AI Prompt
Зона AI-промпт позволяет описать рабочий процесс обычным языком.
Пример промпта:
После написания запроса нажмите Запустить промпт. Браузер начинает работу в правой части экрана, а результат возвращается в виде структурированного JSON.
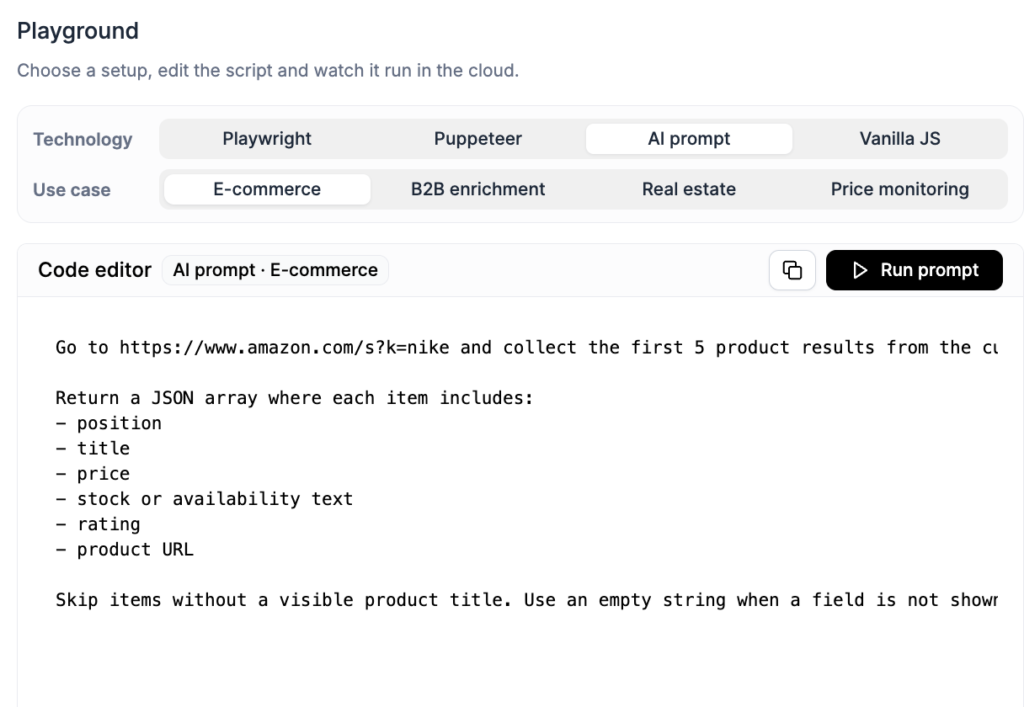
AI Prompt работает лучше всего с конкретными инструкциями. Укажите целевой URL, последовательность действий, количество результатов и точные поля, которые вам нужны.
Шаг 4: настройте прокси, профиль и параметры браузера
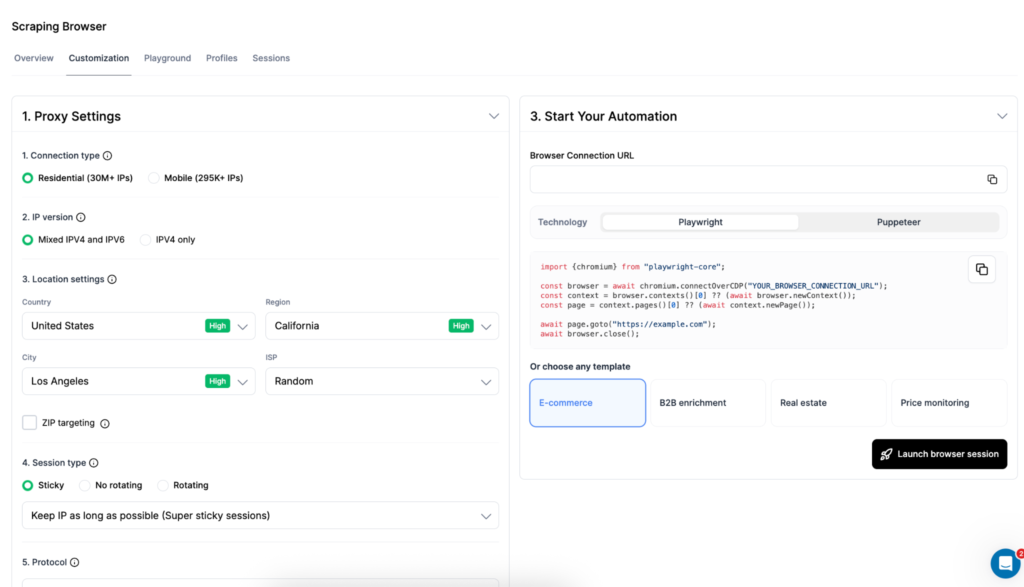
Использование Настройте браузер когда стандартной конфигурации Quick Start не хватает контроля. Открыть её можно на вкладке Overview или перейти сразу в Кастомизация таб.
Здесь вы готовите окружение браузера перед запуском сессии.
Локация прокси и ротация
Scraping Browser работает исключительно с прокси NodeMaven. Перед запуском браузера вы можете выбрать, будет ли сессия использовать резидентский или мобильный трафик, разрешить только IPv4 или смешанный IPv4/IPv6, а также из какой локации должен отображаться браузер.
Настройки локации включают страну, регион, город, ISP и Таргетинг на уровне ZIP. Поведение сессии может быть закреплённым, с ротацией или без ротации.
При локальном скрапинге эти настройки определяют, что вернёт сайт. Если вы собираете данные Amazon, Zillow, или локальные объявления в Лос Анджелес, вы можете выбрать США → Калифорния → Лос-Анджелес или сузить геолокацию с помощью таргетинга по ZIP-коду. Это помогает браузеру стабильнее видеть местные цены, товарные предложения, наличие, варианты доставки и региональные версии страниц.
Использование резидентские прокси для большинства задач публичного веб-скрапинга и просмотра с привязкой к геолокации. Используйте мобильные прокси. когда рабочему процессу нужен трафик мобильных операторов или модели доступа, характерные для мобильных устройств.
Что касается поведения сессии, подбирайте настройку под логику страниц. Ротационные сессии подходят для независимых страниц, каждую из которых можно собирать отдельно. Закреплённые (sticky) сессии подходят для пагинации, фильтров, файлов cookie, состояния авторизации и сохранённых настроек геолокации. Режим без ротации подходит для одного запуска браузера, когда IP должен оставаться неизменным до конца сессии.
Настройки профиля браузера
Профиль браузера сохраняет состояние браузера между сессиями. Он может сохранять файлы cookie, локальное хранилище, кэш, историю браузера и состояние авторизации на сайтах.
Переиспользуемый профиль помогает сохранять одну и ту же идентичность браузера в нескольких запусках, пока сессия авторизации на самом сайте остаётся действительной.
Например, в рабочем процессе мониторинга цен один и тот же профиль можно переиспользовать, чтобы сохранить настройки геолокации, фильтры или сессионные файлы cookie. В процессе обогащения B2B-данных профиль помогает не задавать заново одни и те же настройки портала перед каждым запуском.
Защита браузера
Scraping Browser включает несколько настроек уровня браузера, которые можно изменить до старта сессии.
Extra Stealth управляет настройками отпечатка браузера и защиты от обнаружения. Сервис решения CAPTCHA обрабатывает поддерживаемые проверки CAPTCHA. Cloudflare Web Bot Auth подписывает запросы к поддерживаемым сайтам на Cloudflare. Ad Blocker блокирует рекламу и ненужные ресурсы, что уменьшает вес страницы и снижает лишний расход трафика.
Такая конфигурация заменяет несколько отдельных инструментов, которые командам обычно приходится связывать вручную: провайдер прокси, слой отпечатков, решатель CAPTCHA, среда запуска браузера, инструмент логирования и отладчик со скриншотами.
Расширенные настройки браузера
Расширенные настройки охватывают режим браузера, поведение всплывающих окон, длительность сессии и тайм-аут простоя.
Использование режим headful (с интерфейсом) когда вы занимаетесь отладкой, поскольку видите, что делает браузер. Используйте режим headless (без интерфейса) когда рабочий процесс уже стабилен и не требует визуальной проверки.
Максимальный TTL каждой сессии браузера составляет 30 минут. Если вашему рабочему процессу нужно больше времени, разделите его на несколько более коротких запусков.
Шаг 5: запустите сессию браузера
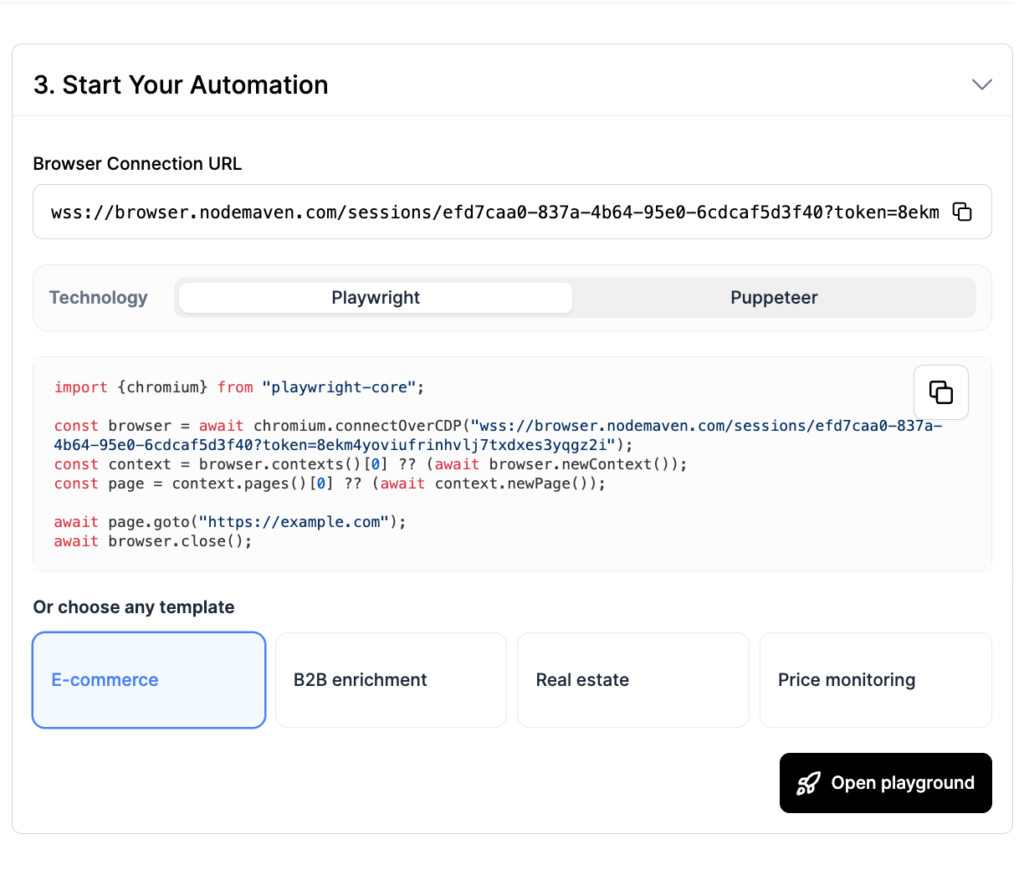
Когда настройки готовы, выберите Playwright или Puppeteer, или выберите один из четырёх шаблонов. Затем нажмите Запустить сессию браузера.
NodeMaven создаёт настроенную сессию браузера и возвращает URL подключения к браузеру.
Разработчики могут скопировать этот URL и подключиться к запущенному браузеру по CDP с помощью Playwright или Puppeteer. Если вы хотите продолжить тестирование в панели управления, нажмите Открыть Playground и запустите настроенную сессию там.
Этот шаг связывает настройку в панели управления с production-автоматизацией. Вы можете протестировать браузер визуально, проверить настройки прокси и браузера, а затем использовать этот URL подключения в своём коде.
Шаг 6: используйте профили для повторяющихся сценариев
Профили нужны для сценариев, в которых браузер должен сохранять состояние между сессиями.
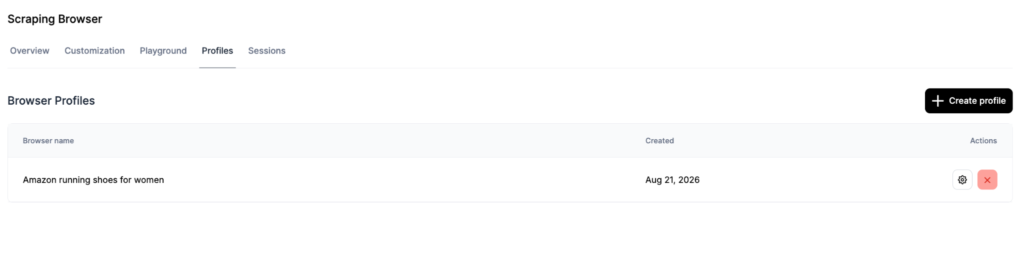
Откройте Профили и нажмите Создать профиль. Укажите название и описание, затем выберите, должен ли профиль хранить кэш браузера. Вы также можете закрепить локацию из первой сессии.
Профили подходят для регулярного мониторинга цен, работы в личных кабинетах, проверки маркетплейсов, B2B-порталов и поиска недвижимости с сохранёнными фильтрами.
Каждый аккаунт включает до 10 профилей браузера по умолчанию.
Профиль отличается от сессии. Сессия — это один запуск браузера с максимальным TTL 30 минут. Профиль хранит состояние браузера, которое можно использовать повторно в нескольких сессиях.
Шаг 7: просмотрите и отладьте сессии
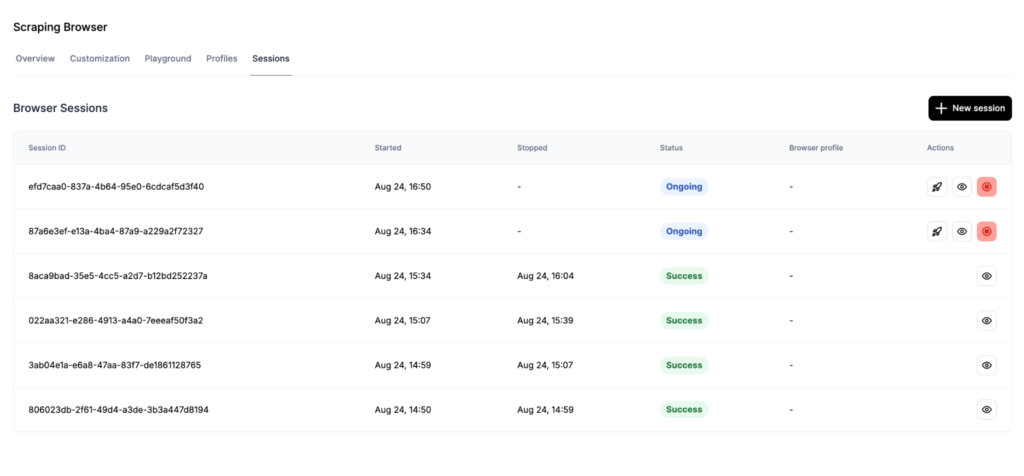
Зона Сессии показывает активные и завершённые запуски браузера.
На этой странице вы можете посмотреть статус сессии, вручную завершить активную сессию, открыть детали сессии, посмотреть записи сессий и отладить завершённые автоматизации.
Статусы простые и понятные. Ongoing означает, что сессия ещё выполняется. Успех означает, что автоматизация завершена. Не удалось означает, что автоматизация завершилась с ошибкой или не была выполнена до конца.
Максимальный TTL каждой сессии браузера составляет 30 минут. Записи сессий и данные для отладки хранятся 3 дня.
Если автоматизация зависла, откройте сессию, проверьте Live Browser или запись, остановите выполнение, обновите скрипт или промпт и запустите новую сессию.
Панель управления или API: когда что использовать
Используйте панель управления, пока сценарий ещё в разработке. Это самое удобное место, чтобы протестировать шаблоны, написать AI-промпты, отладить селекторы, посмотреть Live Browser, проверить вывод консоли и просмотреть JSON, файлы или скриншоты.
Используйте API, когда сценарий уже работает в Playground и его нужно запускать из вашего бэкенда, планировщика или production-системы автоматизации.
Для задач по расписанию и запуска в облаке подключите Scraping Browser к своему бэкенду, очереди, cron-задаче или планировщику через API. Сессии браузера выполняются в облаке, а ваша система решает, когда запустить сессию, какой сайт открыть и как обработать полученные данные.
API-ключ доступен на странице Обзор . Приложения могут подключаться к запущенному браузеру по CDP с помощью Playwright или Puppeteer.
Обычно продуманный рабочий процесс выглядит так:
- Протестируйте автоматизацию в Playground.
- Настройте параметры прокси и браузера.
- Проверьте результат.
- Перенесите рабочий сценарий в API.
Благодаря этому продакшен-код остаётся чище: панель управления показывает большинство проблем скрапинга ещё до начала интеграции.
Цены и лимиты
NodeMaven Scraping Browser имеет отдельной платы за использование браузера. Клиенты платят только за трафик ротационных прокси NodeMaven израсходованный во время сессий браузера.
Это значит, что за работу браузера, Live Browser, AI-промпты, решение CAPTCHA и запись сессий отдельная плата не взимается.
Если вы тестируете NodeMaven впервые, вы можете Начните с 750 МБ трафика резидентных и мобильных прокси за $3.50. После этого тарифы на ротационные резидентные и мобильные прокси начинаются от $2.20/GB.
Пользователи могут отслеживать трафик в разделе Дашборд → Разбивка по доменам → Scraping Browser. Настраиваемого лимита трафика на одну сессию сейчас нет, но активные сессии можно в любой момент завершить вручную.
Лимиты по умолчанию:
| Лимит | Включено по умолчанию |
| Профили браузера | До 10 |
| Активные сессии браузера | До 50 одновременно |
| Максимальный TTL сессии | 30 минут |
| Хранение записей | 3 дня |
Лучшие сценарии использования NodeMaven Scraping Browser
Scraping Browser подходит для задач, где сайту нужен настоящий браузер, стабильная геолокация, взаимодействие со страницей или визуальная отладка.
Скрапинг e-commerce
Страницы интернет-магазинов часто используют JavaScript, фильтры, всплывающие окна, настройки местоположения, карточки товаров и динамические блоки с ценами.
Scraping Browser от NodeMaven может собирать названия товаров, цены, наличие, рейтинги, URL товаров и скриншоты с отрисованных страниц. По смежным сценариям смотрите руководства NodeMaven по Скрейпинг цен и скрапингу Amazon.
Обогащение B2B-данных
Обогащение B2B-данных обычно включает работу с поисковыми полями, фильтрами, страницами каталогов и профилей, а также структурированное извлечение данных.
Scraping Browser может перемещаться по публичным каталогам компаний, собирать видимые поля с данными о компаниях и возвращать структурированный JSON. AI-промпт также помогает не-разработчикам описать процесс извлечения данных без ручного написания селекторов.
Скрапинг недвижимости
Сайты недвижимости часто меняют выдачу в зависимости от местоположения, фильтров, режима карты, почтового индекса и доступности объявлений.
Scraping Browser может собирать объявления, цены, адреса, статус доступности и результаты локального поиска. Для локальных задач таргетинг по почтовому индексу помогает браузеру увидеть нужную региональную версию страницы.
Мониторинг цен
Мониторингу цен нужна стабильность. Если сайт сохраняет местоположение, валюту, варианты доставки или фильтры, автоматизация не должна произвольно менять геолокацию. Используйте sticky-сессии или переиспользуемый профиль браузера, если один и тот же сценарий запускается регулярно.
Сбор данных для AI и RAG
Scraping Browser может возвращать структурированный JSON, файлы, скриншоты и извлечённые данные страницы. Это делает его практичным решением для AI-процессов, где собранные веб-данные должны попадать в базу данных, векторный индекс, конвейер обогащения или RAG-систему.
Для таких процессов держите запуск браузера сфокусированным: загрузите страницу, извлеките поля, проверьте результат и передайте чистые структурированные данные дальше.
Основные проблемы и исправления
Страница показывает неверную локацию
Проверьте таргетинг по стране, региону, городу и ZIP, профиль браузера и настройки прокси-сессии.
Если сайт хранит локацию в файлах cookie, используйте нужный профиль браузера повторно или очистите старое состояние перед тестированием нового региона.
Автоматизация зависает
Откройте Live Browser и проверьте вывод консоли. Если браузер ждёт не тот элемент, застревает на всплывающем окне или страница загружается медленно, остановите сессию, отредактируйте скрипт или промпт и запустите заново.
Завершённые сессии также можно просмотреть в записях.
Состояние входа пропадает
Используйте постоянный профиль браузера. Профили сохраняют файлы cookie, локальное хранилище, кэш, историю браузера и авторизованное состояние на сайте.
Если вход всё равно пропадает, возможно, сессия на самом сайте истекла или была аннулирована.
Постоянно появляется CAPTCHA
Оставьте CAPTCHA Solver включённым, затем проверьте качество прокси, скорость запросов, поведение сессии и ограничения сайта.
Решение CAPTCHA работает с поддерживаемыми типами проверок, но повторяющиеся запросы CAPTCHA обычно означают, что процессу нужны более медленные действия, лучшая непрерывность сессии или другая конфигурация прокси.
Расход трафика выше ожидаемого
Тяжёлые страницы, изображения, видео, реклама, повторные попытки и зависшие сессии увеличивают трафик. Используйте Ad Blocker там, где это уместно, и завершайте зависшие сессии вручную.
Проверьте расход в Дашборд → Разбивка по доменам → Scraping Browser , чтобы увидеть общий трафик и трафик по доменам.
Заключение
NodeMaven Scraping Browser проще всего протестировать из дашборда. Начните с Быстрый старт, посмотрите, как шаблон работает в Playground, затем отредактируйте скрипт или переключитесь на AI-промпт для no-code процесса.
Использование Кастомизация когда процессу нужны конкретная локация, sticky-сессия, профиль браузера, решение CAPTCHA или расширенные настройки браузера. Как только автоматизация возвращает нужный JSON, файлы или скриншоты, переведите её в продакшен через API и подключите Playwright или Puppeteer.
Командам, которые уже используют прокси NodeMaven, Scraping Browser снимает много работы по настройке. Среда браузера, AI-промпты, решение CAPTCHA, Live Browser и записи уже включены. Вы платите только за прокси-трафик, использованный во время браузерных сессий.