
How to Look Up an IP Address on a Computer (Windows, Mac & Linux)



Here’s the fast answer. Your own IP on a computer: ipconfig in Command Prompt on Windows, System Settings > Network on Mac, ip addr show on Linux. That’s your local address. For your public IP, or the details behind any address that isn’t yours, you paste it into a lookup tool.
Done. You can stop reading if that’s all you needed.
Still here? Good, because there’s a part almost every guide gets wrong, and it’s the reason people spend twenty minutes looking in the wrong place.
«Look up an IP» isn’t one task. It’s two. And they live in completely different places on your machine. One is grabbing an address you already own. Your computer. Your printer. The laptop in the other room. That’s a settings-and-commands job.
The other is investigation. You’ve got a public IP, maybe yours, maybe a stranger’s from a log, and you want to know what’s behind it. Location. Owner. Whether it’s flagged. No menu on your computer will tell you that.
Figure out which one you’re doing. Everything else is easy after that.
If it’s the second one, there’s a shortcut worth knowing up front. NodeMaven’s free IP Lookup tool takes any IPv4 or IPv6 address and returns its location, ISP, ASN, reverse DNS, proxy/VPN/Tor flags, and a threat score in one shot. No signup. Runs in the browser. Works the same whether you’re checking your own IP, a suspicious one from your logs, or the exit IP your proxy is quietly presenting to the world.
Private vs public IP
Every device carries two addresses. This confuses more people than it should.
The private IP is what your router hands your device inside your own network. 192.168.x.x or 10.0.x.x. Nobody outside your walls sees it. This is your printer’s IP, your local file share, the address you need to connect two machines at home.
The public IP is different. It’s the single address your entire network shows the internet, assigned by your ISP. Every device in the house shares it. It’s what websites log. It’s what leaks your rough location. It’s the one you investigate when an address looks off.
Finding your own IP on a computer
Windows
Command Prompt is fastest.
- Hit the Windows key, type
cmd, press Enter. - Type
ipconfig, press Enter. - Find the IPv4 Address line. That’s your local IP, usually starting
192.168.
Rather click than type? Settings > Network & Internet, pick your active connection, and the IPv4 address sits in the properties.
Worth knowing: ipconfig shows your private IP. Not the public one. For that, scroll down to the lookup section.
Mac
- Open System Settings (System Preferences on older macOS).
- Click Network.
- Select your active connection on the left. IP’s on the right.
Terminal person? ipconfig getifaddr en0 for Wi-Fi, en1 for Ethernet. Returns the private IP, no menus.
Linux
Two commands, pick either:
ip addr show, then read theinetline under your active interfacehostname -I, which just prints your private IPs
ifconfig still works if it’s installed, but ip addr is the current standard.
Finding another device’s local IP
Chasing down a printer, smart TV, NAS, or a second computer on your network? Two reliable routes.
Your router. Type its IP (192.168.0.1 or 192.168.1.1 usually) into any browser, log in, find the “Connected Devices” or “DHCP Clients” list. Everything on the network shows up with its assigned local IP.
The command line. arp -a lists devices your machine has recently talked to, with their IPs. Works on Windows, Mac, and Linux the same way.
Printers are their own small headache depending on the model, so that’s a separate walkthrough.
Looking up a public IP
This is where your computer’s settings stop being useful. A public IP doesn’t live on your machine, it lives in public registration and geolocation databases, and you need something that queries them.
That’s the whole job of NodeMaven’s IP Lookup tool. Browser-based, nothing to install.
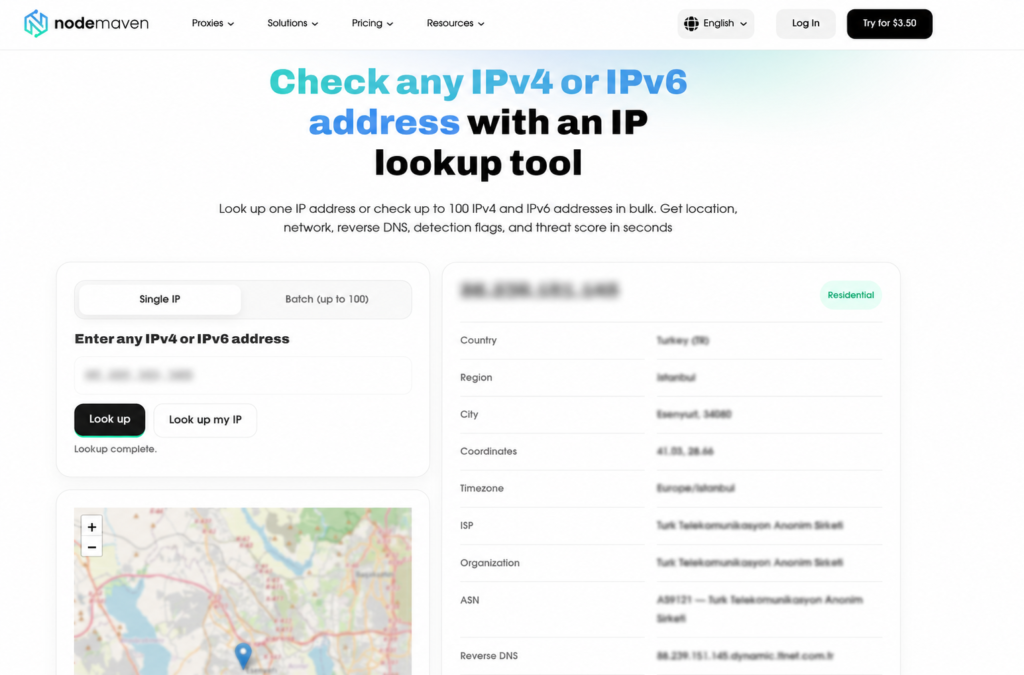
Three steps:
- Open the tool.
- Enter an address, or check your own. Paste any IPv4 or IPv6 into the field and hit Look up. Want the public IP your network’s currently showing? Click Look up my IP instead, it grabs it automatically.
- Read the result. Full breakdown, plus a map pin on the location.
| Field | What it tells you |
|---|---|
| Country / Region / City | Rough location, down to city and postal area |
| Coordinates | Approximate lat/long |
| Timezone | Local timezone tied to the IP |
| ISP | The provider the address belongs to |
| Organization | The registered network behind it |
| ASN | The network’s Autonomous System Number |
| Reverse DNS | Hostname linked to the IP, if there is one |
| Detection flags | Proxy, VPN, Tor, hosting, or mobile? |
| Threat score | Risk rating from reputation signals |
There’s a Batch tab too, up to 100 addresses at once. Good for a proxy list or a pile of IPs pulled from logs.
One expectation to set, though. Geolocation is approximate. Country, region, usually the city, plus ISP and network, yes. A street address or someone’s name? No. Anyone telling you an IP alone delivers that is selling you something the data can’t back up.
How to check what IP your proxy is using
A proxy’s entire job is to make sites see its IP instead of yours. So you look up that exit IP, and you see exactly what those sites see.
Two ways to check.
What’s my proxy showing right now? Proxy on in your browser or antidetect tool, open the lookup, click Look up my IP. Instead of your real address, you get the proxy’s exit IP with its full profile. Fastest way to confirm the proxy’s live and routing before you start anything real.
Check a specific proxy from the list. Already have the endpoint IP? Paste it into Single IP, or drop the whole list into Batch, and look it up without routing through it first.
Now, the fields that actually matter here:
- Country, region, city: is it exiting where it’s supposed to? A “Texas” proxy resolving to another state gets flagged the instant it hits anything location-sensitive.
- ISP and organization: a real carrier or home provider name reads natural. Bought “residential” and seeing a cloud host in the org field? That’s a problem.
- Detection flags: the big one. If proxy, VPN, or hosting says yes, the platforms you’re targeting can see it too. Which kills the entire point.
- Threat score: low is clean. High means the IP already carries baggage that gets you blocked before you’ve done anything.
Put it together: proxy comes back as a datacenter IP, hosting flag on, threat score high? There’s your answer for why the accounts keep getting blocked. A clean one shows a residential or mobile ISP, no proxy or hosting flags, low threat score.
And that’s really down to proxy quality. NodeMaven’s residential, mobile, and ISP proxies run through a quality filter before they ever reach you, so they’re built to pass that exact check, real ISP data, clean flags, low scores. Check any of them yourself in the tool before you trust them.

There’s a $3.50 trial with 750MB if you want to test our proxies.
When you’d reach for a public IP lookup
Real situations where this is the right move:
- Verifying a proxy or VPN before a workflow, so a flagged IP doesn’t wreck it mid-run.
- Chasing down suspicious traffic. Weird IP in your server logs or account activity? The lookup shows its origin and whether it’s hosting or anonymized.
- Confirming your public IP changed. ISPs rotate them. Quick self-lookup, done.
- Checking localized content is actually serving from the IP location you expect.
If any of that’s a regular part of your work, bookmark the tool. It’s the fast first check before you lean on a connection.