Как использовать резидентские прокси: полное руководство по настройке NodeMaven и лучшие практики

Если вы ищете, как использовать резидентские прокси, то это пошаговое руководство поможет вам начать работу с NodeMaven.
Независимо от того, являетесь ли вы новичком или опытным пользователем, мы покажем вам, как настроить прокси, избежать ошибок и интегрировать его с такими инструментами, как Multilogin, Playwright и Puppeteer.
Попробуйте высококачественные резидентские и мобильные прокси за $3.50 и получите 750 МБ трафика.
Как использовать резидентские прокси с NodeMaven
Прежде чем приступить к использованию резидентских прокси, вам потребуется:
1. Войти на ваш аккаунт NodeMaven
Ещё нет? Создать аккаунт — это займет всего минуту.
2. Купить трафик или активировать План испытаний
→ Начните с 750 МБ всего за 1,4350 доллара, чтобы опробовать все возможности.
- Ручная настройка через личный кабинет (для полного контроля и настройки)
- Настройка персонального прокси (быстро и просто для начинающих)
Давайте рассмотрим оба варианта ниже.
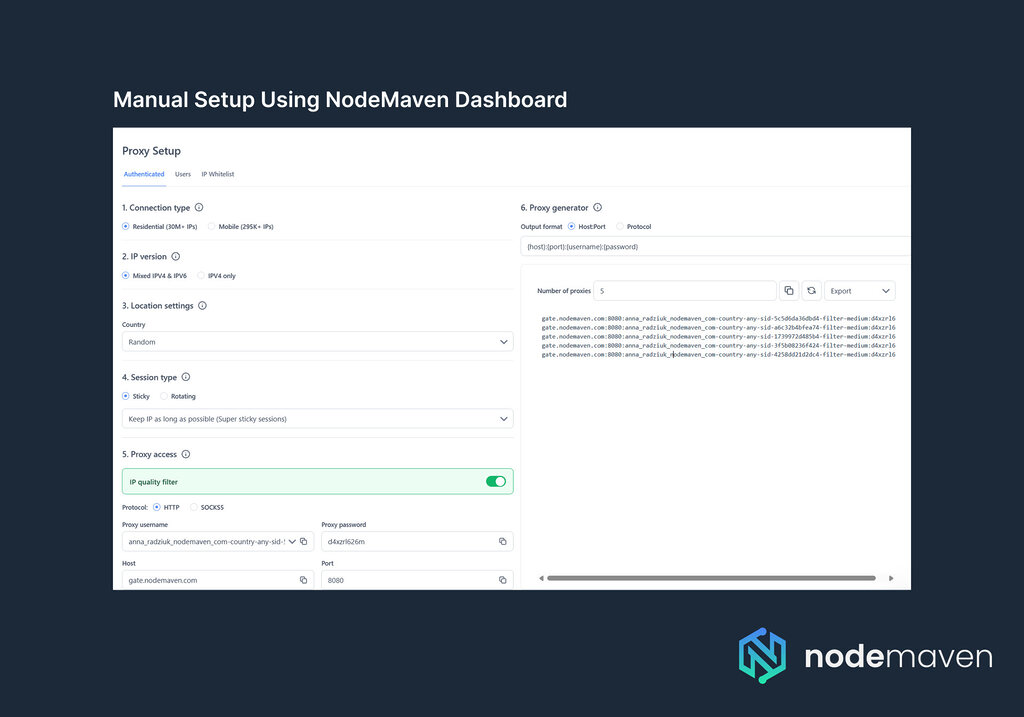
Пошаговое ручное руководство по настройке с использованием личного кабинета NodeMaven для полного контроля
Независимо от того, являетесь ли вы новичком или опытным пользователем прокси, NodeMaven упрощает настройку высококачественных резидентских прокси с помощью интуитивно понятного личного кабинета.
Вот пошаговое руководство, которое поможет вам начать.
1. Выберите метод настройки: Аутентификация, Пользователи или Белый список IP
В Настройка прокси, вы увидите три варианта аутентификации. Выберите тот, который лучше всего подходит для вашего сценария:
- Аутентифицирован: Используйте имя пользователя и пароль прокси-сервера. Работает с большинством инструментов и дает полный контроль — идеально для общего использования.
- ПользователиСоздайте отдельные субсчета с индивидуальными учётными данными. Например, это лучший выбор для команд, управляющих доступом для нескольких пользователей.
- IP-белый список: Авторизуйте доступ по вашему IP-адресу, вход не требуется. Кроме того, это отлично подходит для серверов или инструментов, которые не поддерживают аутентификацию.
Совет: Если не уверены, начните с Аутентифицировано — это самый универсальный вариант.
2. Поймите свои учетные данные прокси
В Настройка прокси-сервера раздел, вы найдете свой Имя пользователя и пароль прокси.
- Эти учетные данные предоставляют доступ к прокси-сети — сохраняйте их в безопасности.
- Ваш имя пользователя динамическое и будет меняться в зависимости от выбранных вами параметров конфигурации (тип IP, версия IP, местоположение, тип сессии и т. д.).
- Ваш пароль остается прежним.
3. Выберите тип подключения
Выберите одно из:
- Резидентские (30млн+ IP-адресов)
- мобильные (295 тысяч+ IP-адресов)
Заметка: Выбор одного автоматически обновит ваше имя пользователя прокси с правильными параметрами.
4. Выберите версию IP
Выберите из:
- Смешанный IPv4 и IPv6 (расширенный пул IP-адресов)
- Только IPv4 (для более строгой совместимости)
5. Установить целевое местоположение
Выберите страну, регион или город — или оставьте как есть Случайный получать IP-адреса из любой точки мира. Также вы можете выбирать целевые группы по интернет-провайдеру в расширенных настройках.
Заметка: Изменение настроек местоположения обновляет ваше имя пользователя для прокси в реальном времени.
6. Выберите тип сессии
Выберите из:
- Sticky: Сохраняйте один и тот же IP-адрес до 24 часов. Вы можете настроить продолжительность сессии, введя значение в секундах (например, 10800 = 3 часа).
- RotatingПолучать новый IP-адрес с каждым запросом.
7. Включите фильтр качества IP и выберите протокол
- IP-фильтр качестваГарантирует, что вам выделены IP-адреса с высокой репутацией и неотслеживаемые.
- Протокол: Выберите между HTTP или SOCKS5 в зависимости от вашего варианта использования.
Узнать больше о IP-фильтрация и прокси-протоколы
8. Сгенерируйте список ваших прокси
- Выберите формат вывода:
- Хост:Порт или протокол (например, http://username:password@host:port)
- Введите количество необходимых прокси.
- Скопируйте список или экспортируйте его в файл CSV/TXT.
9. Начните использовать ваши прокси
Теперь вы можете интегрировать список прокси в предпочитаемый вами инструмент или скрипт.
Заметка: NodeMaven поддерживает такие инструменты, как Multilogin, AdsPower, Dolphin Anty и другие.
Вот пример строки прокси для использования с cURL:
curl -k -x http://PROXYUSER-country-us-sid-bffe3f4943264-filter-medium:[email protected]:8080 -L https://nodemaven.comЗамените PROXYUSER и PASSWORD вашими учетными данными.
Попробуйте высококачественные резидентские и мобильные прокси за $3.50 и получите 750 МБ трафика.
Быстрая настройка с инструментом настройки личного прокси NodeMaven
Если вы хотите более быстрый и упрощенный опыт, попробуйте Настройка личного прокси инструмент — так как он идеально подходит для новых пользователей.
Заметка: Для использования этой функции у вас должен быть доступный трафик или активный тарифный план в вашем аккаунте.
Как это работает:
- Перейдите в свою панель → прокрутите вниз до Настройка личного прокси → Нажмите Запустить установку
- Шаг 1: Выберите, как вы планируете использовать прокси (например, скрейпинг, управление аккаунтами)
- Шаг 2: Выберите платформы (например, Google, Facebook, eBay) или выберите “Другое”
- Шаг 3: Выберите локации — выберите страны, регионы, города и количество IP-адресов
- Шаг 4: Выберите программное обеспечение, которое вы будете использовать (например, браузер Antidetect или Custom)
- Шаг 5: Выберите ваш протокол и формат вывода. Вы получите список прокси-серверов, настроенный под ваши нужды, + четкие инструкции по интеграции на основе выбранного вами инструмента.
Вот и всё — теперь вы готовы использовать высококачественные резидентские прокси NodeMaven менее чем за 5 минут.
Использование прокси-серверов с антидетект-браузерами, инструментами автоматизации и API
Когда ваши настройки прокси будут готовы, их интеграция в любимые инструменты будет простой.
Независимо от того, работаете ли вы с антидетект-браузерами, такими как Мультилогин, AdsPower, или Дельфин Анти, фреймворки автоматизации, такие как Драматург или Кукловод, или используя наши API, NodeMaven поддерживает всё это.
Совет: Если вы не уверены, с чего начать, Инструмент настройки персонального прокси в вашей панели инструментов помогает создавать готовые к использованию конфигурации и инструкции, адаптированные к вашему конкретному случаю.
Для всего остального мы предоставляем пошаговые руководства по интеграции и подробная документация для широкого спектра браузеров, инструментов автоматизации и пользовательского программного обеспечения на нашем Страница интеграций, в Справочный центр NodeMaven и в нашем Руководство по доступу к API.
Совет: У вас уникальный сценарий использования или вам нужна помощь с интеграцией? Наша команда поддержки клиентов всегда готова помочь — просто свяжитесь с нами в любое время.
Использование IP-фильтра качества NodeMaven для повышения производительности
IP-фильтр NodeMaven автоматически блокирует IP-адреса низкого качества и подозрительные IP-адреса, помогая вам избежать банов, капч, мошенничества и замедлений.
Он анализирует каждый IP-адрес на основе репутации, истории поведения и типа подключения, прежде чем назначить его вам.
Используя только чистые, надежные IP, вы получаете:
- Меньше блокировок и повторных попыток при автоматизации или скрейпинге
- Улучшенная стабильность и более длительные сессии (до 24 часов+)
- Более безопасная, быстрая и надёжная работа во всех сценариях использования
Этот умный фильтр встроен в каждый резидентский и мобильный прокси, который вы используете в NodeMaven — никаких дополнительных настроек не требуется.
Лучшие практики использования резидентских прокси и распространенные ошибки, которых следует избегать
Эффективное использование резидентских прокси требует большего, чем просто подключение IP-адреса — речь идет об умной конфигурации, последовательном поведении и избежании обнаружения.
- Вращайте IP-адреса с умом, чтобы избежать блокировокСлишком долгое использование одного и того же IP-адреса или его использование на разных учетных записях может привести к блокировке. Следовательно, вам следует использовать ротационные прокси для скрейпинга и «липкие» сессии для входа — NodeMaven поддерживает оба варианта.
- Отслеживайте показатели успеха и избегайте подозрительного поведенияВысокий процент неудач, капчи или блокировки? Замедлитесь, рандомизируйте действия и имитируйте реальных пользователей, чтобы избежать обнаружения.
- Используйте таргетинг (город, интернет-провайдер) для более точных результатов: Таргетируйте по стране, городу или интернет-провайдеру, чтобы ваши прокси выглядели более аутентичными. Личный кабинет NodeMaven делает это легко.
- Игнорируя репутацию IP и качествоНизкокачественные IP-адреса = мгновенная блокировка. Фильтр качества IP-адресов NodeMaven предоставляет вам 95%+ чистых IP-адресов, проверяемых в режиме реального времени.
- Неправильная настройка заголовков или отпечатковДаже с резидентскими IP-адресами несоответствие отпечатков пальцев может вас выдать. В частности, поддерживайте соответствие заголовков, языков и часовых поясов с вашим прокси.
Совет: Хотите узнать больше? Посетите наш бесплатный вебинар: Понимание браузерного фингерпринтинга: лучшие практики для безопасности
Ключевые преимущества и варианты использования резидентских прокси
- Больше анонимности и доверия: Резидентские IP-адреса поступают от реальных устройств, поэтому ваш трафик выглядит так, как будто он исходит от обычного пользователя. Таким образом, это помогает избежать блокировок, CAPTCHA и обнаружения во время выполнения конфиденциальных задач.
- Обход географических ограничений и систем защиты от ботовПолучите IP-адреса из конкретных стран, городов или даже от интернет-провайдеров для доступа к контенту с региональными ограничениями и обхода фильтров против ботов без срабатывания предупреждений.
- Идеально подходит для скрейпинга, автоматизации, мультиаккаунтинга и проверки рекламыИспользуйте резидентские прокси для сбора данных, управления аккаунтами, проверки объявлений или автоматизации процессов в большом масштабе — и все это с сохранением стабильности и избежанием блокировок.
- Лучшая защита от мошенничества и внесения в черный списокБлагодаря встроенному фильтру качества IP-адресов NodeMaven вы получаете доступ к чистым IP-адресам с хорошей репутацией, что снижает риск попадания в черный список или блокировки.
Почему стоит выбрать NodeMaven для резидентских прокси?
Если вы ищете высокопроизводительные резидентские прокси, сочетающие в себе скорость, гибкость и надежность, NodeMaven предлагает одно из самых продвинутых решений на рынке.
Вот что нас отличает:
- 95%+ чистые IP-адреса, отфильтрованные в режиме реального времени: Наш собственный IP-фильтр качества гарантирует, что вы получаете только IP-адреса с высоким уровнем доверия и необнаруживаемые, что снижает вероятность блокировок, капчи и неудачных запросов.
- Бесшовное управление прокси: Настройте все — от типа прокси и версии IP до таргетинга и продолжительности сессии — через простой и интуитивно понятный личный кабинет.
- Единый доступ к пулу мобильных и резидентских прокси: Не нужно управлять отдельными сервисами, потому что вы можете легко переключаться между мобильными и резидентскими прокси из одной учетной записи и ценовой политики.
- Гибкое, прозрачное ценообразование: Платите только за использованный трафик. Независимо от того, тестируете ли вы, или масштабируетесь агрессивно, наши тарифы адаптируются к вашему сценарию — без скрытых платежей.
NodeMaven дает вам полный контроль, чистые IP-адреса и лучшие результаты — без усложнения вашей настройки или завышения бюджета.
Попробуйте высококачественные резидентские и мобильные прокси за $3.50 и получите 750 МБ трафика.


