Windows Proxy Settings: How to Set Up and Use a Proxy on Windows 10/11

Windows proxy settings help you route supported browser and app traffic through a proxy server. For everyday users, that means you can change the IP address your Windows PC uses online. For business workflows, it can help with location-based research, testing, account access, web scraping, and desktop automation.
This guide shows how to use a proxy server on Windows 10 and Windows 11, how to configure manual proxy settings, how to test the connection, and how to disable or change the proxy later.
What Are Windows Proxy Settings?
Windows proxy settings are the system-level controls that tell your PC to send supported traffic through a proxy server. Instead of connecting to websites directly, your computer connects through the proxy first.
This gives you a different visible IP address. The website sees the proxy IP, not the direct IP of your device or local network.
Automatic proxy setup vs manual proxy configuration
Windows gives you two main proxy setup options: automatic setup and manual proxy configuration.
- Automatic setup is usually used in offices, schools, or managed networks. It can rely on a setup script or an auto-discovery system. If your company manages your device, this may already be configured for you.
- Manual proxy configuration is the option most users need when they buy proxies from a provider. You enter the proxy server address and port yourself, then authenticate with a username and password if required.
For NodeMaven proxies, manual setup is the practical path. You generate the proxy details in the dashboard, paste them into Windows proxy settings, and then test the connection.
What proxy server settings you need before setup
Before you configure proxy server settings on Windows, prepare the connection details. This saves time and helps avoid the most common setup errors. You can find them in your proxy provider dashboard.
- Proxy IP or hostname: for NodeMaven, this is usually gate.nodemaven.com.
- Port: use the port that matches your selected protocol and setup.
- Protocol: HTTP is the standard choice for Windows native proxy settings; SOCKS5 may be used in apps or tools that support it directly.
- Username and password: copy these from your NodeMaven dashboard.
- Location and session settings: choose the country, city, or session type before copying the proxy details.
If you are using proxies for repeated work, session stability matters. Changing IPs too often can break logins, testing flows, or location-sensitive results.
Use residential and mobile proxies with stable sessions, SOCKS5/HTTP support, and pre-filtered IPs for reliable Windows proxy setup. Start with 750MB for just $3.50.
How to Use a Proxy Server in Windows 10 and Windows 11
Windows proxy settings let you add a proxy at the system level, so supported browsers and apps can route traffic through the proxy without a separate browser extension. Below is the manual proxy setup flow using NodeMaven proxy details.
Step 1: Configure your proxy in the NodeMaven dashboard
This is the part where accuracy matters most: one wrong port or protocol can stop the connection from working.
- Open your NodeMaven dashboard.
- Go to the proxy setup section.
- Choose the location, session type, and protocol you need.
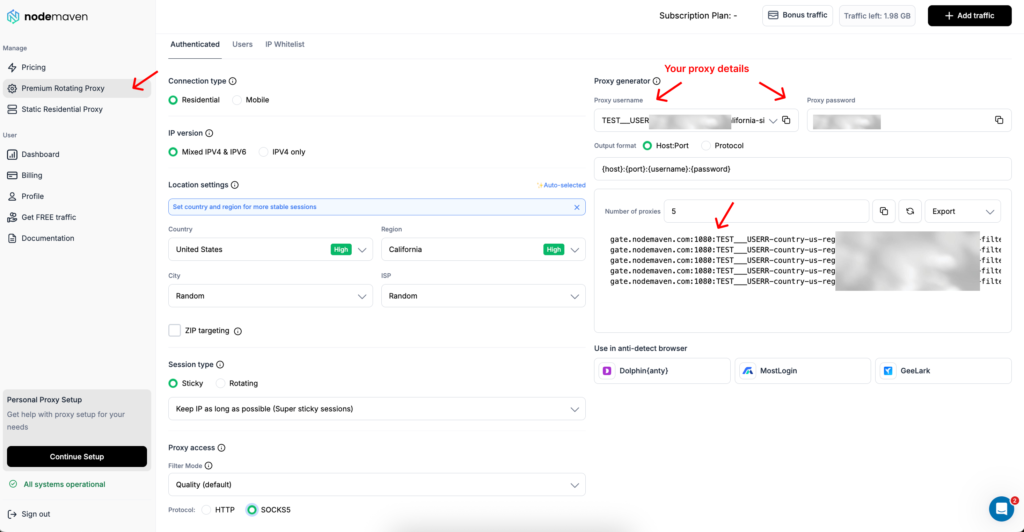
- Copy your proxy server details.
- Proxy IP address: gate.nodemaven.com
- Port: use 8080 for HTTP setup. Use 1080 only for SOCKS5 workflows in apps or tools that support SOCKS5 directly.
Use residential and mobile proxies with stable sessions, SOCKS5/HTTP support, and pre-filtered IPs for reliable Windows proxy setup. Start with 750MB for just $3.50.
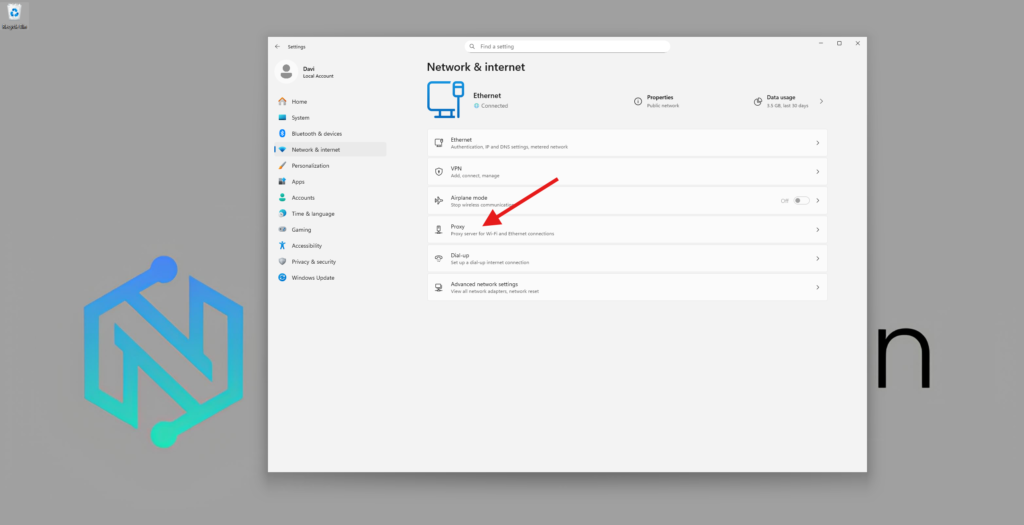
Step 2: Open Windows proxy settings
Start from the Windows network settings page. The wording is slightly different across Windows versions, but the path is similar.
- Right-click the network icon in the bottom-right corner of your screen.
- Click Network and Internet settings.

- In the settings window, open Proxy.
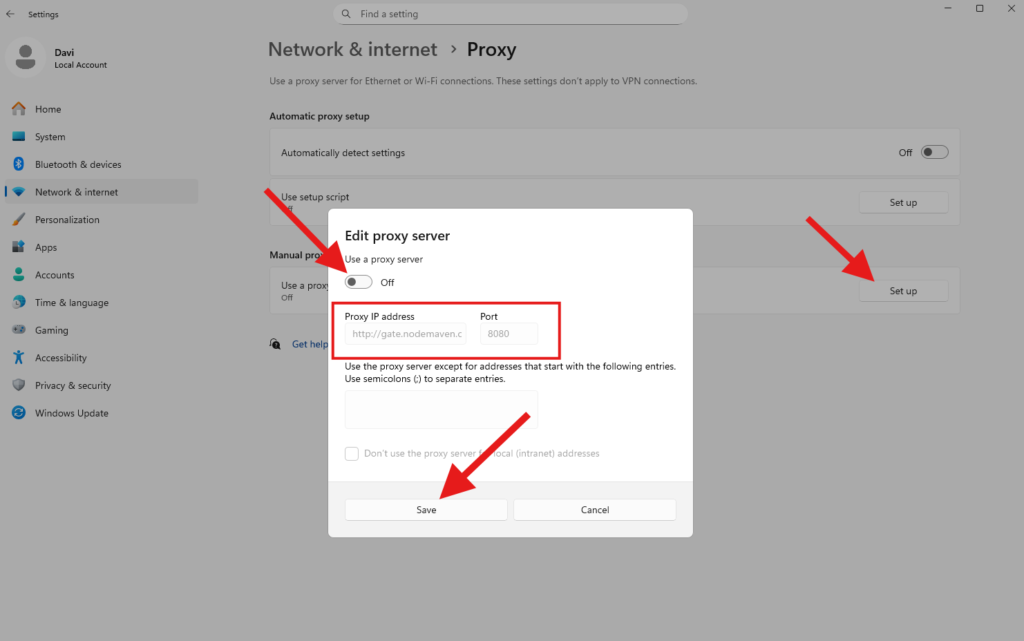
Step 3: Choose manual proxy configuration
On the proxy settings page, look for the manual setup section. This is where you enter the proxy address and port yourself.
- Scroll to Manual proxy setup.
- Click Set up next to Use a proxy server.
- Turn the proxy switch on.
- Enter the proxy server details:
- Proxy IP address: gate.nodemaven.com
- Port: use 8080 for HTTP proxy setup. Use 1080 only for SOCKS5 workflows in apps or tools that support SOCKS5 directly.
Step 4: Authenticate with your NodeMaven username and password
After saving the proxy, open your browser and visit any website. If the proxy requires authentication, Windows or the browser will ask for a username and password.
- Copy your proxy username from the NodeMaven dashboard.
- Copy your proxy password from the same setup screen.
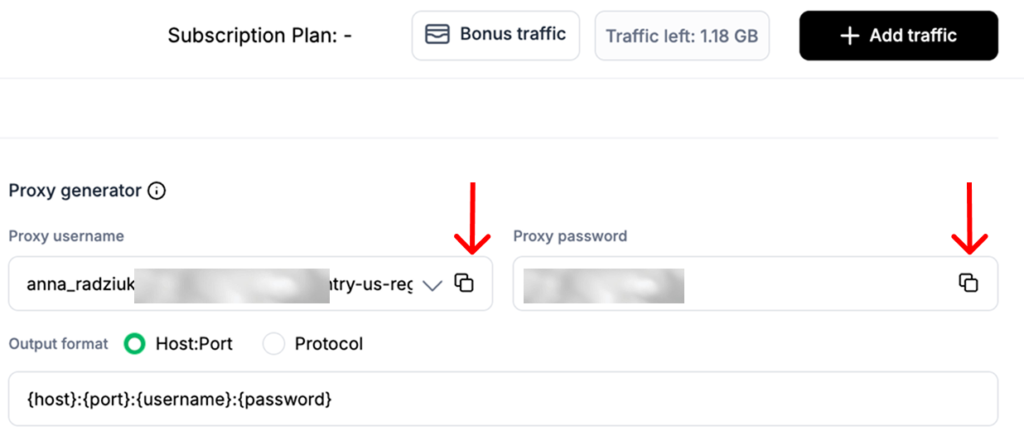
- Paste both into the authentication popup.
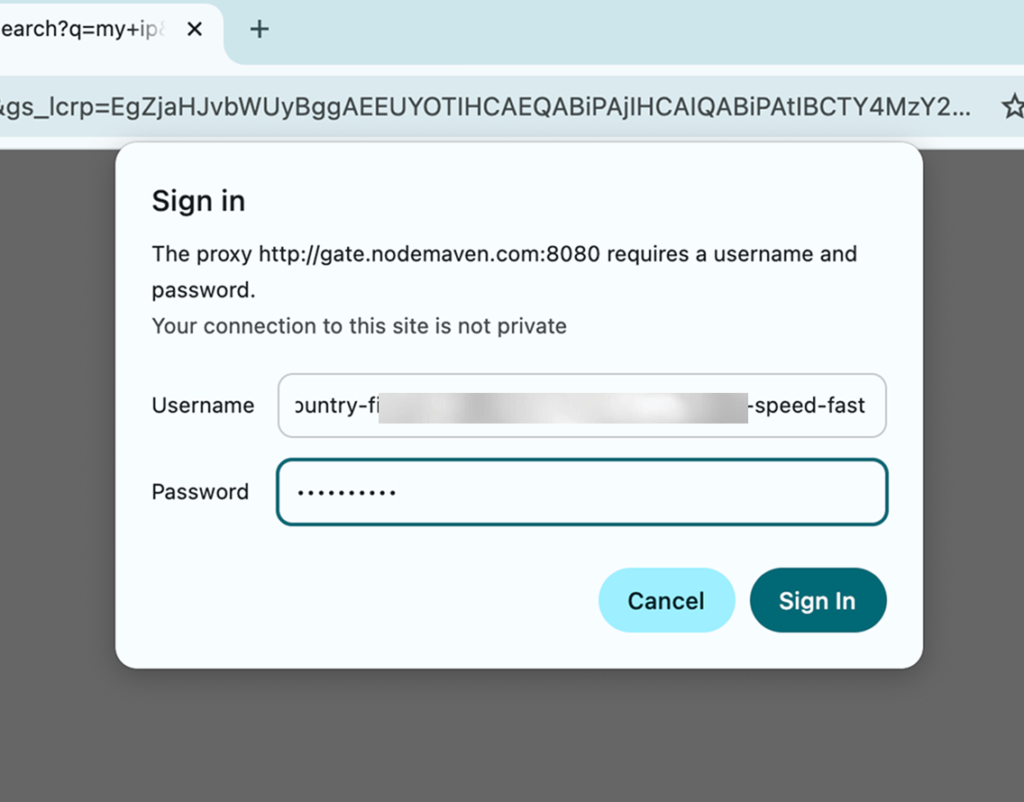
- Click Sign in.
If the popup keeps appearing, check the username, password, port, and protocol. Most failed Windows proxy setup issues come from one of those fields.
Step 5: Test your proxy connection
Do not assume the proxy works just because the settings were saved. Test it before starting your actual workflow.
- Open an IP checker tool in your browser.
- Confirm that the visible IP location matches the location selected in NodeMaven.

- If the location is wrong, check your dashboard settings, proxy port, and authentication details.
Testing is especially important if you need the proxy for desktop research, account access, ad verification, ecommerce checks, or location-sensitive pages.
How to Disable or Change Proxy Settings on Windows
You may need to disable the proxy after testing, switch to another location, or update your proxy server settings. The process is quick once you know where the manual proxy setup panel is.
How to disable proxy settings on Windows 10/11
- Open Settings.
- Go to Network & Internet.
- Open Proxy.
- Find Manual proxy setup.
- Turn off Use a proxy server.
- Save the change if Windows asks you to confirm.
After disabling the proxy, refresh your IP checker page. Your visible IP should return to your regular network IP.
How to change proxy server details
To change proxy server details, go back to the same Windows proxy settings page and edit the address or port. If you are switching countries or session types in NodeMaven, update the dashboard setup first, then copy the new details into Windows.
If you change only the port without changing the protocol, the proxy may stop working. Keep the Windows settings and the NodeMaven dashboard setup aligned.
Windows Proxy Settings vs Browser Proxy Extensions
Windows proxy settings and browser proxy extensions solve slightly different problems. The best option depends on how much control you need.
When Windows proxy settings are enough
System proxy settings are useful when you want a simple desktop proxy setup and do not need different proxy profiles for different browsers or tasks. It is a good option for quick testing, basic browsing, and simple location checks.
The downside is that some apps may ignore system proxy settings, and switching between multiple proxies can feel slow if you do it often.
When browser proxy extensions are easier
A browser proxy extension can be better if your work happens mostly in Chrome, Edge, or Firefox. Extensions often let you save multiple proxy profiles, switch faster, and keep proxy use limited to the browser.
For example, if you need one proxy for research and another for a testing session, browser-level control may be more convenient than changing Windows settings each time.
Check out our Chrome proxy settings guide for more information.
When proxy software for Windows makes sense
Proxy software for Windows may help when you need per-app rules, SOCKS5 routing, or more advanced desktop proxy control. It is more setup work, but it can be useful for workflows where Windows native proxy settings are too limited.
Common Windows Proxy Setup Problems and Fixes
Windows proxy settings are simple, but small setup mistakes can still break the connection. If the proxy does not work after setup, start with the basics before changing the whole configuration.
Proxy server is not working after setup
The most common reason is a mismatch between the proxy address, port, and protocol. Check that the proxy server settings in Windows match the details in your proxy dashboard.
Also check the username and password, especially if you copied them manually. One extra space can be enough to stop the proxy from connecting.
Browser asks for username and password
This is normal when you use authenticated proxies. After you save the proxy in Windows, your browser may ask for the proxy username and password the first time it tries to load a page.
Copy the credentials from your NodeMaven dashboard and enter them in the popup. If the popup keeps returning, the credentials, port, or protocol may be wrong.
Windows proxy settings are not saving
On personal devices, this is often fixed by closing the Settings window and opening it again. On work laptops, proxy settings may be controlled by an administrator or company policy.
If the proxy switch turns off by itself or the fields reset, check whether your device is managed by an organization before troubleshooting the proxy provider.
Proxy works in browser but not in every app
Not every desktop app follows Windows proxy settings. Some apps use their own network settings, and others may need a separate proxy configuration inside the app.
If you need app-level control, a proxy manager, like Proxifier, or browser-level setup may be easier than relying only on system proxy settings.
Best Proxy Type for Windows Proxy Settings
The best proxy for Windows depends on what you are trying to do. For simple browsing, research, testing, or location-based access, choose the proxy type around stability and trust level first.
Residential proxies for natural browsing and research
Residential proxies use real household IPs, which makes them a strong default for natural browsing, market research, web testing, and workflows where IP trust matters.
They are especially useful when websites are sensitive to datacenter traffic or repeated requests from the same type of IP.
ISP proxies for fast and stable desktop sessions
ISP proxies are a good fit when you want fast, stable sessions from static IPs. They combine strong connection stability with residential-like legitimacy, which is useful for desktop workflows that need consistency.
For Windows proxy settings, ISP proxies are often the easiest choice when you want one reliable IP for repeated access.
Mobile proxies for mobile-style workflows
Mobile proxies are useful when your workflow depends on carrier-like IP behavior. They are usually more specific than residential or ISP proxies, so they make the most sense when the target platform expects mobile traffic patterns.
Why NodeMaven Is a Strong Choice for Windows Proxy Setup
Windows proxy setup is only as reliable as the IPs behind it. You can enter the right proxy address, port, username, and password, but if the IP is overloaded or already flagged, the connection can still feel unstable.
NodeMaven is built around IP quality instead of huge, messy proxy pools. That matters for Windows users who need a proxy for research, testing, account workflows, ecommerce checks, or location-based browsing.
With NodeMaven, you get:
- Clean IPs that reduce unnecessary blocks and failed sessions
- Stable sessions for desktop workflows that need consistency
- Residential, ISP, and mobile proxies for different use cases
- SOCKS5 and HTTP support depending on your setup
- Consistent performance for repeated Windows proxy use
- Quality guarantee and cashback for more efficient cost management
The main advantage is simple: NodeMaven helps you spend less time fixing proxy issues and more time actually using the connection.
Use residential and mobile proxies with stable sessions, SOCKS5/HTTP support, and pre-filtered IPs for reliable Windows proxy setup. Start with 750MB for just $3.50.


