How to Get Free ChatGPT Plus: Step-by-Step Guide

Many users search for how to get ChatGPT Plus for free because the paid version gives better limits, faster access, and more advanced features than the free plan.
This guide explains how free ChatGPT Plus offers usually work, how much ChatGPT costs, whether ChatGPT Plus is worth it, and how to get ChatGPT Plus for free with proxies.
How much is ChatGPT Plus?
The price of ChatGPT Plus depends on the country, local taxes, currency, and billing rules shown in your ChatGPT account.
In most countries, ChatGPT Plus usually costs around $20 per month, but the final price can be slightly higher or lower depending on where you subscribe from. In some regions, users may see local currency pricing, added VAT, or different payment conditions.
As a general range, ChatGPT Plus typically falls around $20–$25 per month after taxes or local adjustments. The exact amount should always be checked on the official upgrade screen before confirming payment.
How much does ChatGPT cost?
ChatGPT can be free or paid, depending on the plan you choose.
| Plan | Best for | Cost type |
| Free ChatGPT | Casual use, simple prompts, light research | Free |
| ChatGPT Plus | Frequent individual use | Monthly subscription, usually around $20–$25/month |
| ChatGPT Pro | Heavy individual use | Higher monthly subscription |
| ChatGPT Business or Team | Companies and teams | Per-user monthly subscription |
| ChatGPT API | Developers and apps | Usage-based pricing |
For most individual users, the main choice is between the free plan and ChatGPT Plus. The free plan is enough for basic tasks, while ChatGPT Plus is better for users who need higher limits, more stable access, and advanced features.
How to get ChatGPT Plus for free: step-by-step
Step 1: Register a new email account
To start, create or use an email account that you can fully access.
Some users claim that certain email providers receive trial offers more often than Gmail, iCloud, or other common providers. However, this is not guaranteed, and there is no confirmed rule that one email provider always works better than another. In our guide, we used a Gmail account.
The safest option is simple:
- Use an email account you own
- Make sure you can receive verification codes
- Avoid buying unknown email accounts
- Avoid using someone else’s inbox
- Keep access to the email for future account recovery
A ChatGPT account is connected to your email, so using an account you do not control can create problems later.
Step 2: Prepare clean browser environments
Before creating or managing multiple ChatGPT accounts, prepare a clean and separate browser environment for each account.
You do not need an antidetect browser for a basic setup. In most cases, separate browser profiles are enough to keep cookies, sessions, and logins from overlapping.
Separate browser profiles
Create a dedicated browser profile for each ChatGPT account. This helps keep every account environment isolated and easier to manage.
To do this:
- Open Chrome, Firefox, or Edge.
- Create a new browser profile.
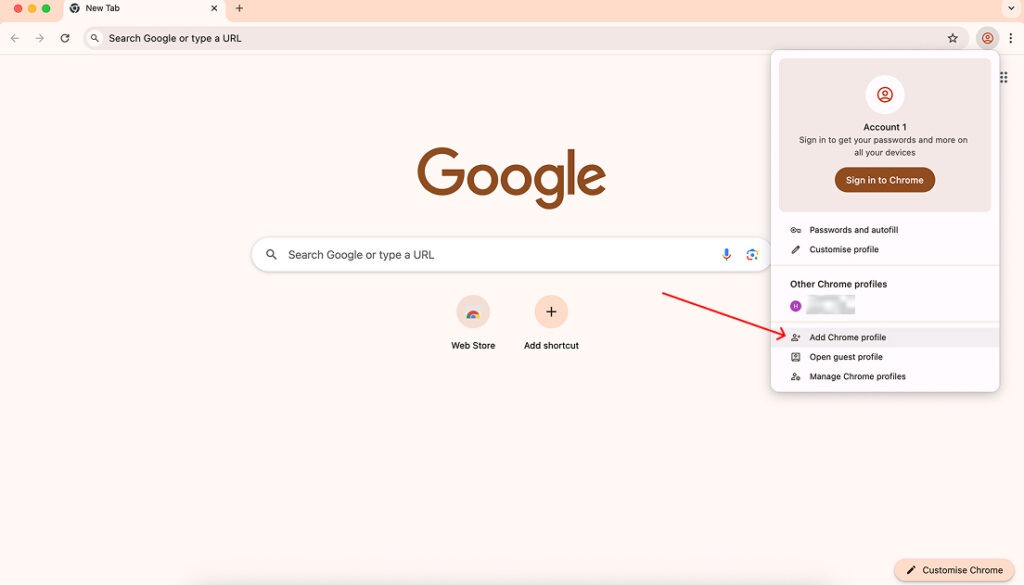
- Name the profile based on the account or workflow.
- Disable syncing with your personal Google, Apple, or Microsoft account.
- Use only one ChatGPT account per browser profile.
- Keep cookies, sessions, and saved logins separated.
This helps prevent session conflicts, repeated logins, and accidental overlap between accounts.
Keep each environment simple
A clean browser profile combined with a stable proxy session makes account management easier and more consistent. For longer workflows, use sticky sessions so each profile keeps the same IP during the session.
Step 3: Set up a proxy
Next, set up a proxy connection before creating or logging into your ChatGPT account.
For this setup, you will need an IP address from a country where ChatGPT access is usually stable, such as Finland or Germany. NodeMaven supports targeting across 190+ countries, so you can choose the location that fits your access needs.
If you only need the proxy for this process, NodeMaven’s trial is usually enough. You can get 750MB of residential and mobile proxy traffic for $3.50, which is suitable for light browser-based ChatGPT usage.
Inside the NodeMaven dashboard:
- Open the Premium Rotating Proxies section in the dashboard.
- Choose residential or mobile proxy type.
- Select Finland, Germany, or Austria as the target country.
- Enable sticky sessions to keep the same IP during the setup.
- Select the Quality + Speed filter for a cleaner IP and faster connection.
- Select the HTTP protocol.
- Copy your proxy credentials for the next step.
Using sticky sessions helps keep your browser connection consistent while you register, log in, and check whether the ChatGPT free offer appears. The Quality + Speed filter also helps improve connection reliability by prioritizing clean IPs with stronger performance.
Get and manage ChatGPT Plus accounts with high-quality residential and mobile proxies for $3.50 and get 750MB of bandwidth
Step 4: Add a proxy manager extension to your browser
After choosing your proxy location in NodeMaven, add a proxy manager extension to your browser. This lets you route only your browser traffic through the proxy without changing the connection settings for your whole device.
If you use Chrome, you can configure a SOCKS5 proxy with a browser extension such as Simple Proxy Switcher or another proxy management tool from the Chrome Web Store.
Here is how to set it up:
- Open the Chrome Web Store.
- Search for a proxy extension Chrome users commonly use, such as Simple Proxy Switcher.
- Click Add to Chrome and install the extension.
- Open the extension settings.
- Create a new proxy profile.
- Copy from the dashboard and enter the proxy details from your NodeMaven dashboard ({host}:{port}:{username}:{password})
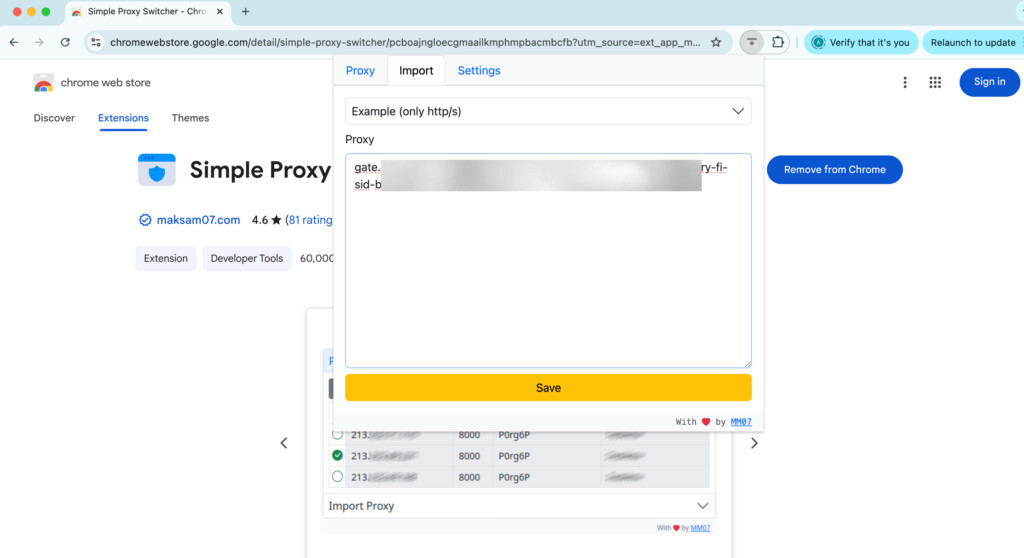
- Save the profile.
- Enable the proxy profile in the extension.
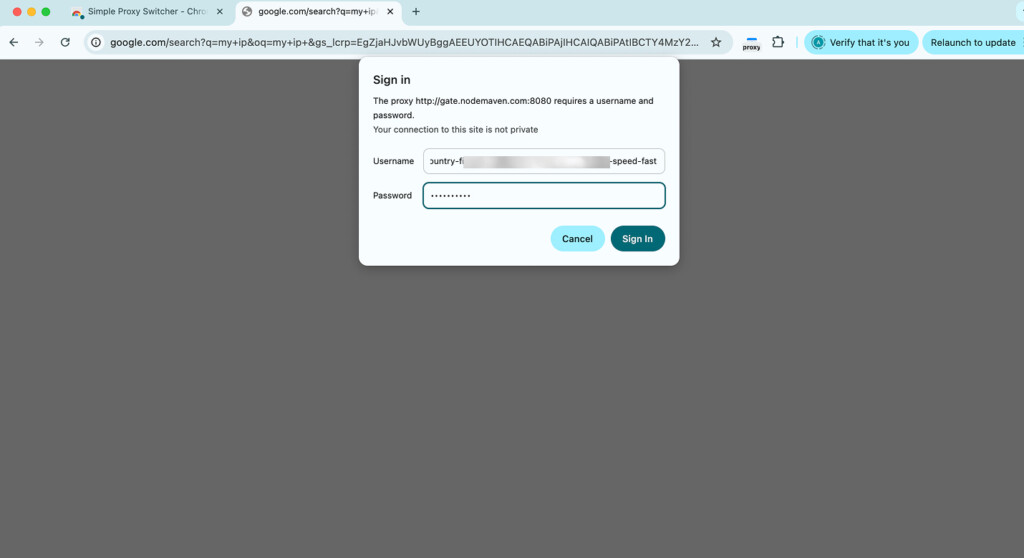
- Copy your proxy username and proxy password from the dashboard for authentication.
- Check your IP through IP checker tool.
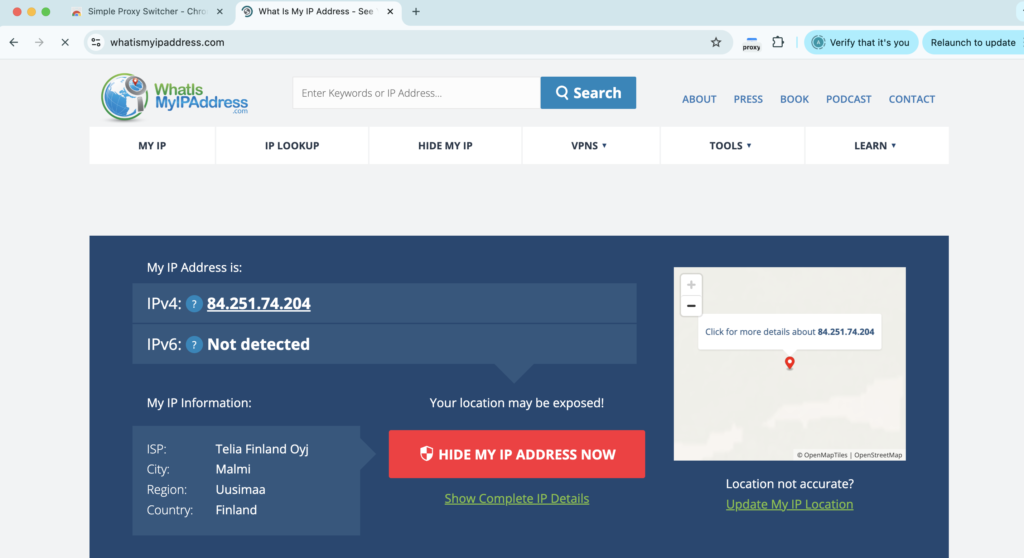
Once enabled, your browser traffic will be routed through the selected proxy server. This helps keep your ChatGPT setup separate from the rest of your device traffic and gives you more control over the session location.
Step 5: Register on ChatGPT
Once the proxy is enabled in your browser, go to ChatGPT and start the usual registration process.
Create your account as you normally would:
- Open the ChatGPT website in the same browser where the proxy is enabled.
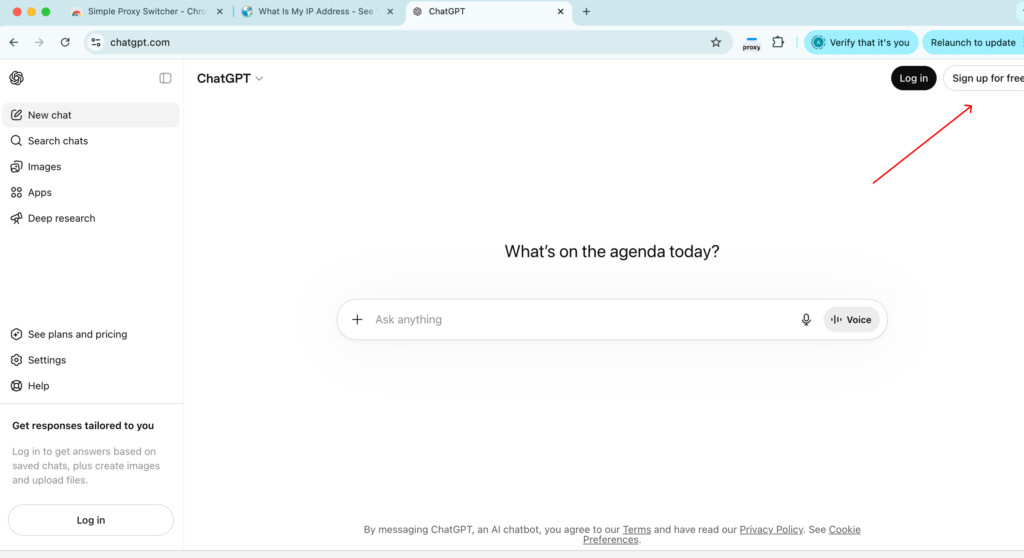
- Click Sign up for free.
- Enter the email address you want to use for registration.
- Confirm your email if ChatGPT sends a verification message.
- Complete any required account setup steps.
- Log in to your new ChatGPT account.
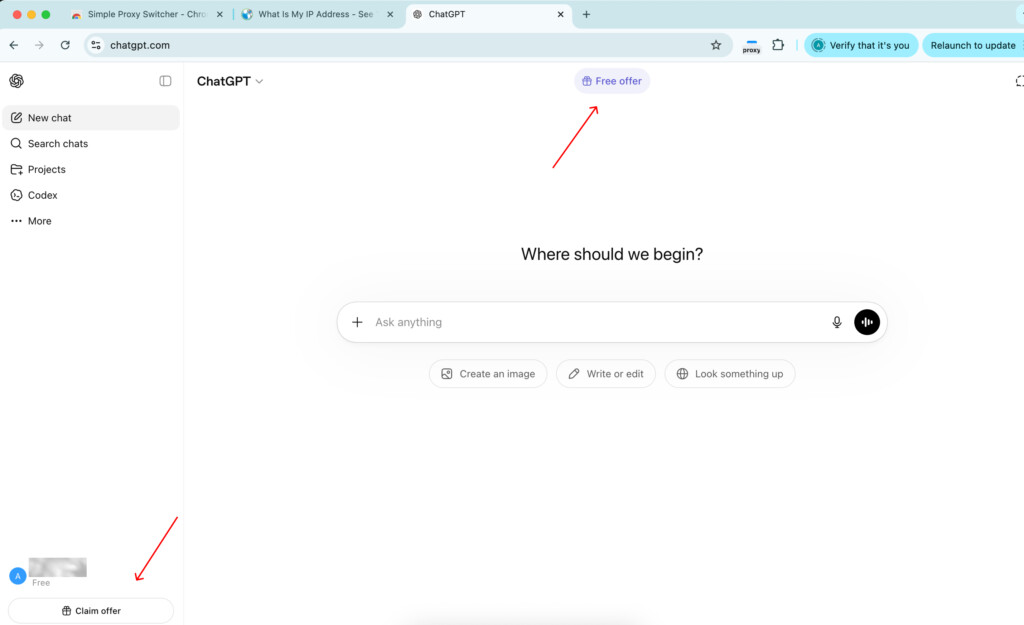
After registration, check the top area of the ChatGPT interface. If your account is eligible for a free trial, you may see a button or banner with a free offer, such as Try Plus free, Try Business free, or Free offer.
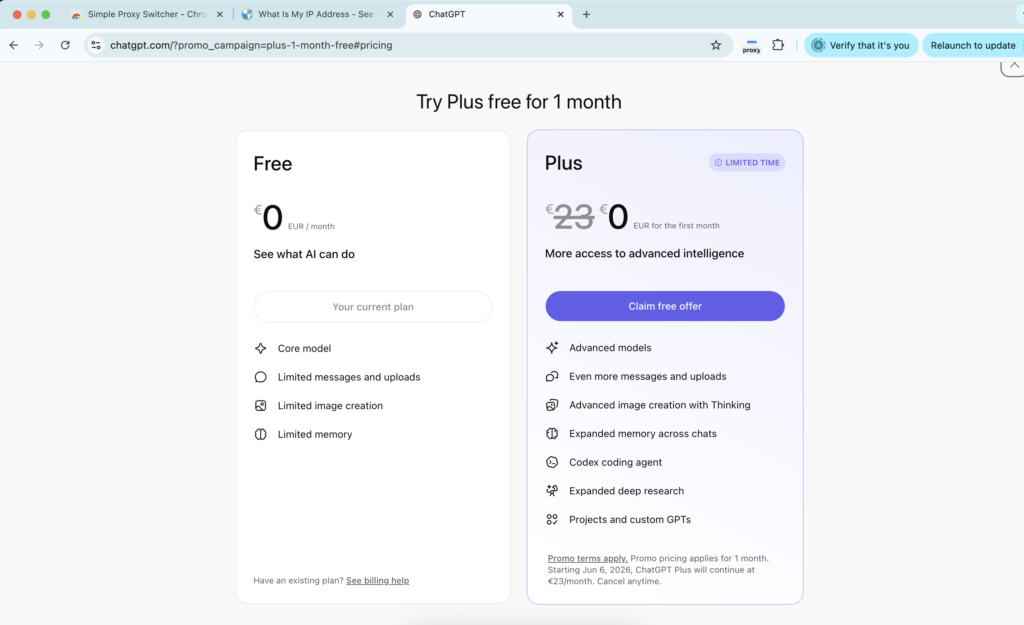
The offer is not guaranteed and may depend on your account, region, and current availability. If it appears, review the terms, billing details, and renewal date before activating it.
Step 6: Use ChatGPT proxies for unlimited multi-account creation and management
You can create and manage multiple ChatGPT Plus accounts, proxies can help keep each browser environment more stable and consistent.
A proxy setup helps you:
- Assign a separate IP setup to different browser profiles
- Keep sessions more consistent with sticky IPs
- Reduce connection overlap between accounts
- Manage accounts across different locations when needed
- Avoid constantly switching a VPN on and off
For this type of workflow, proxy quality matters. Clean IPs, stable sessions, and consistent performance help make account management smoother.
NodeMaven supports residential, mobile, and ISP proxies for your uninterrupted workflow. Residential and mobile proxies are useful when you need flexible targeting and session control, while ISP proxies are better for long-term static sessions where the same IP should stay consistent.
Get and manage ChatGPT Plus accounts with high-quality residential and mobile proxies for $3.50 and get 750MB of bandwidth
Is ChatGPT Plus worth it?
ChatGPT Plus can be worth it if you use ChatGPT regularly for work, study, content creation, coding, research, or daily productivity.
The main value is not only access to premium features. It is the ability to work with fewer limits, better availability, and more consistent performance during longer sessions.
When ChatGPT Plus is worth it
ChatGPT Plus is usually worth it if you:
- Use ChatGPT every day
- Rely on AI for work tasks
- Need higher message limits
- Want more stable access during busy periods
- Use ChatGPT for writing, coding, research, or analysis
- Work with longer prompts or more complex tasks
- Want access to newer or more capable models when available
For example, if ChatGPT helps you write content faster, debug code, summarize documents, prepare reports, or automate repetitive work, the monthly cost can be easier to justify.
When ChatGPT Plus may not be worth it
ChatGPT Plus may not be necessary if you only use ChatGPT from time to time.
The free plan may be enough if you mostly use it for:
- Simple questions
- Basic rewriting
- Short summaries
- Casual brainstorming
- Translations
- Learning simple concepts
If you do not hit limits often and do not need premium features, staying on the free plan may be the better choice.
ChatGPT Free vs ChatGPT Plus
| Factor | Free ChatGPT | ChatGPT Plus |
| Cost | Free | Paid monthly |
| Best for | Casual use | Frequent work |
| Usage limits | Lower | Higher |
| Access stability | May vary | Usually more consistent |
| Advanced features | More limited | Broader access |
| Value | Good for light users | Better for daily users |
So, is ChatGPT Plus worth it?
For business users, freelancers, students, developers, marketers, and content teams, the upgrade can make sense because ChatGPT becomes part of the daily workflow. For occasional users, the free plan is usually enough.
A simple rule: if you use ChatGPT several times a week and often wait, hit limits, or need better performance, ChatGPT Plus is likely worth considering.
Explore our guide ChatGPT Unblocked: Access ChatGPT Without VPN in 2026
Why NodeMaven is the best choice for ChatGPT account management
Managing ChatGPT accounts workflows requires three things: clean IPs, stable sessions, and consistent performance. Random proxies or overloaded VPNs can cause unstable logins, repeated session issues, and poor connection quality.
NodeMaven is built for reliable account management at scale, with a focus on IP quality instead of raw proxy volume.
- Clean IPs for separate profiles
Each ChatGPT account can run in its own browser profile with a dedicated proxy setup. NodeMaven provides clean, pre-filtered IPs and country targeting across 190+ locations, helping keep account environments separated and consistent. - Stable sessions for longer workflows
For ChatGPT, stable sessions matter more than constant IP rotation. NodeMaven supports sticky sessions, so each account can keep the same IP during registration, login, and daily use. - Quality + Speed filter for better performance
- NodeMaven’s Quality + Speed filter helps prioritize cleaner IPs with stronger performance. This is useful for smoother browser sessions, faster loading, and fewer connection interruptions.
- Flexible proxy options
NodeMaven offers residential, mobile, and ISP proxies for different account setups. - Quality guarantee and cashback
NodeMaven also adds extra value with a quality guarantee and cashback. If a proxy does not perform as expected, eligible cases can be replaced or compensated. Residential and mobile proxy users can also earn cashback in bonus traffic based on usage, making ongoing ChatGPT workflows more cost-efficient. - Easy to test before scaling
ChatGPT account management does not require much bandwidth. NodeMaven’s $3.50 trial with 750MB is enough to test proxy locations, sticky sessions, and browser profiles before scaling your setup.
Get and manage ChatGPT Plus accounts with high-quality residential and mobile proxies for $3.50 and get 750MB of bandwidth


