Android Proxy Settings: How to Set Up a Proxy on Android




Android proxy settings look simple at first: open Wi-Fi settings, add a hostname and port, save, and browse. In practice, it is not always that simple, and users might face some issues.
This guide walks through the practical options: native Android Wi-Fi proxy settings, how to disable a proxy, and how to set up Android proxies with proxy manager apps: Shadowrocket and Happ.
We will also cover which proxy type works best for Android workflows, and why NodeMaven proxies are a strong fit when you need to solve connection issues, manage accounts without blocks, collect public data, and automate your workflow at scale.
What Is Android Proxy?
Android proxy settings let your device route supported traffic through a proxy server instead of connecting directly to a website or app.
When the proxy is active, the destination sees the proxy IP address rather than your direct network IP. This can be useful for location testing, app QA, browser sessions, account workflows, market research, and public data scraping.

Use residential, mobile, and ISP proxies with sticky sessions, SOCKS5 support, and pre-filtered IPs. Start with 750MB for just $3.50
When Do You Need a Proxy for Android?
An Android proxy is useful when you need more control over how your phone connects to apps, websites, or online services.
- Testing apps or websites from different locations
- Browsing geo-restricted platforms
- Checking mobile user experiences by region
- Managing separate accounts, browser or app sessions
- Running mobile-first account workflows
- Market research and public data collection
- Ad verification and local campaign checks
- Using Android tools that require SOCKS5 or authenticated proxies
If you only need a quick browser test on Wi-Fi, Android’s built-in proxy settings can work. But for most practical workflows, a proxy manager is more convenient because it handles authentication, SOCKS5 setup, stable sessions, and app-level control in one place.
How to Set a Proxy on Android Wi-Fi
The built-in Android proxy setup works through Wi-Fi settings. The exact labels may vary depending on your device, Android version, and manufacturer, but the flow is usually similar.
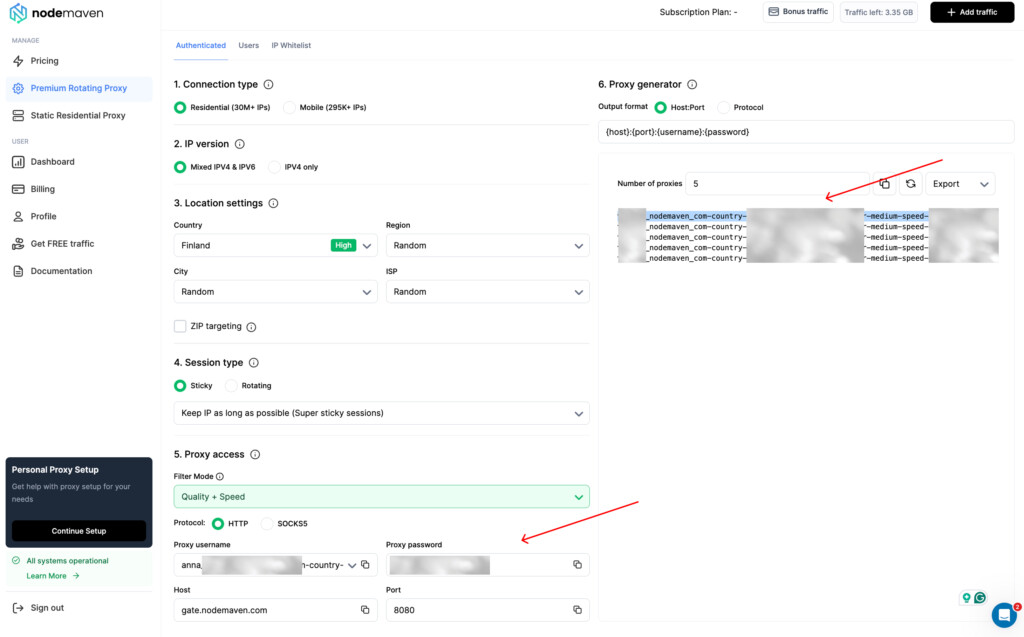
Step 1: Configure and copy your proxy in the dashboard
Go to the Proxy section in your dashboard and choose your proxy type, location settings, session type, and protocol.
Copy your Proxy username, Proxy password, Host and Port.
Use residential, mobile, and ISP proxies with sticky sessions, SOCKS5 support, and pre-filtered IPs. Start with 750MB for just $3.50
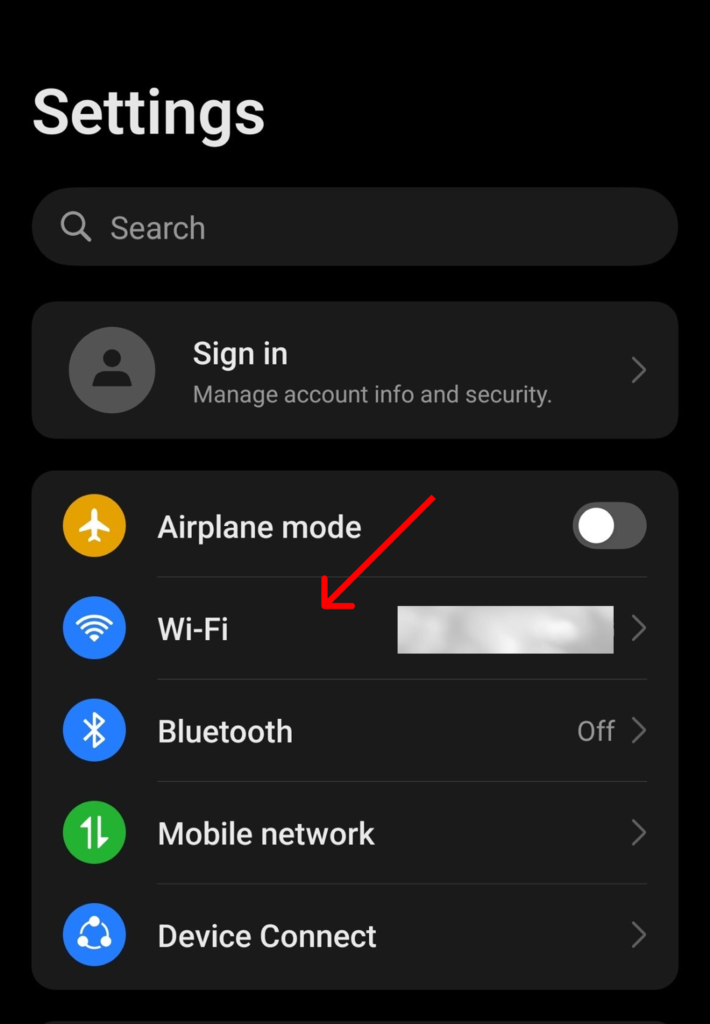
Step 2: Open Wi-Fi settings
Open Settings on your Android device and go to Network & internet, Wi-Fi, or Connections.
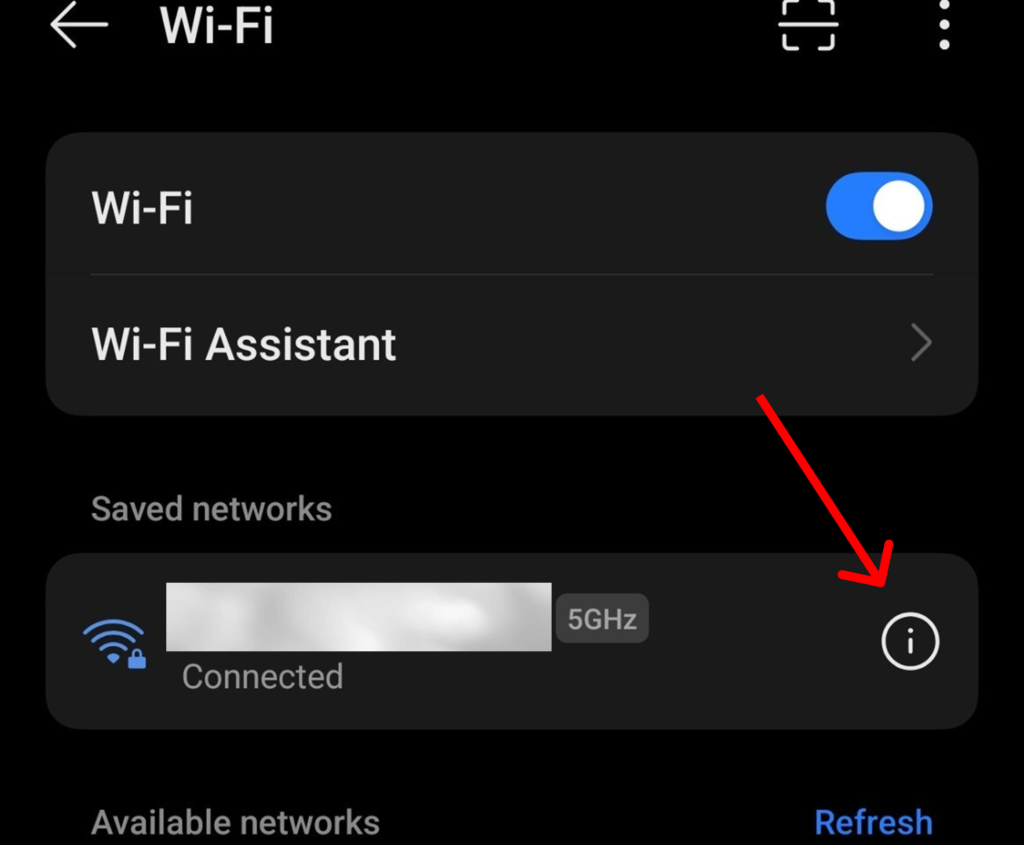
Step 3: Select your connected network
Tap the Wi-Fi network information button. On some devices, you may need to tap the gear icon or hold the network name and choose Modify network.
Step 4: Open advanced options
Look for Advanced options, Proxy, or IP settings. Expand the section if it is hidden.
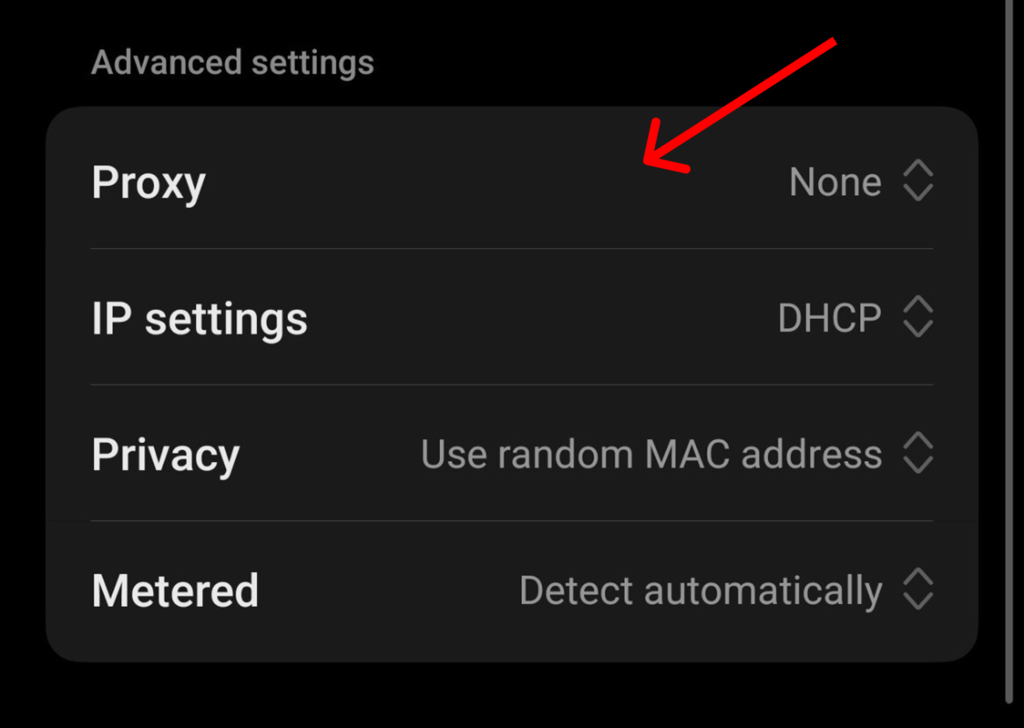
Step 5: Set Proxy to Manual
Change Proxy from None to Manual.
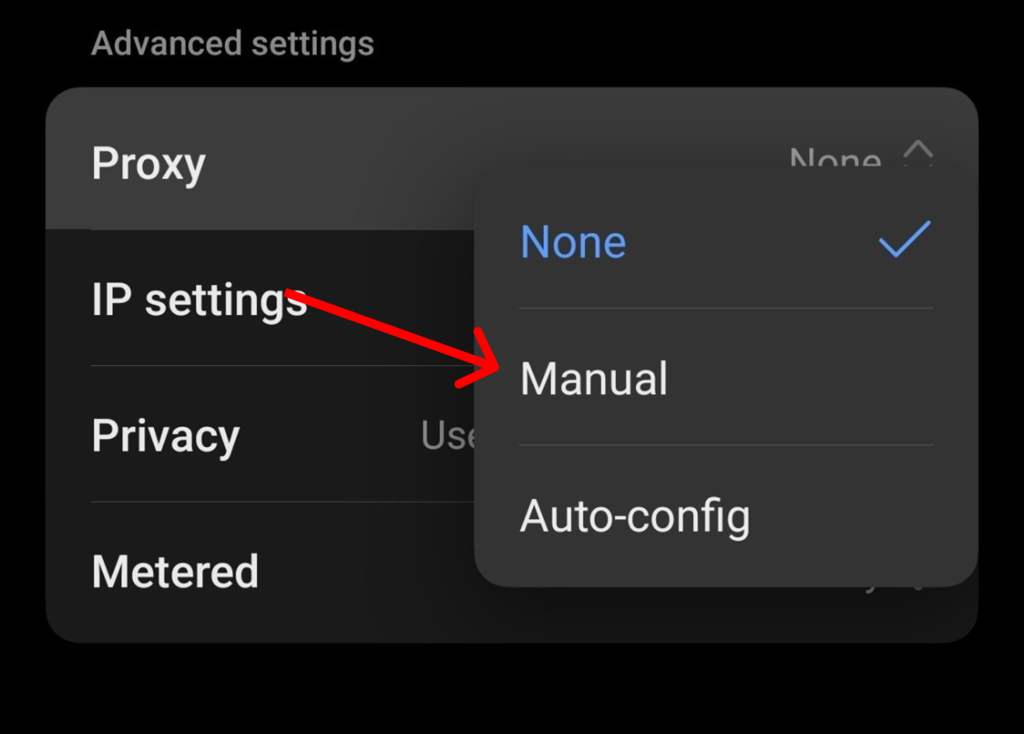
Then enter your proxy hostname and port. Android Wi-Fi proxy settings may not always show username and password fields. If your setup needs authentication, try to go to any website, and the authentication window will pop up. However, for some devices, a proxy manager app can be easier.
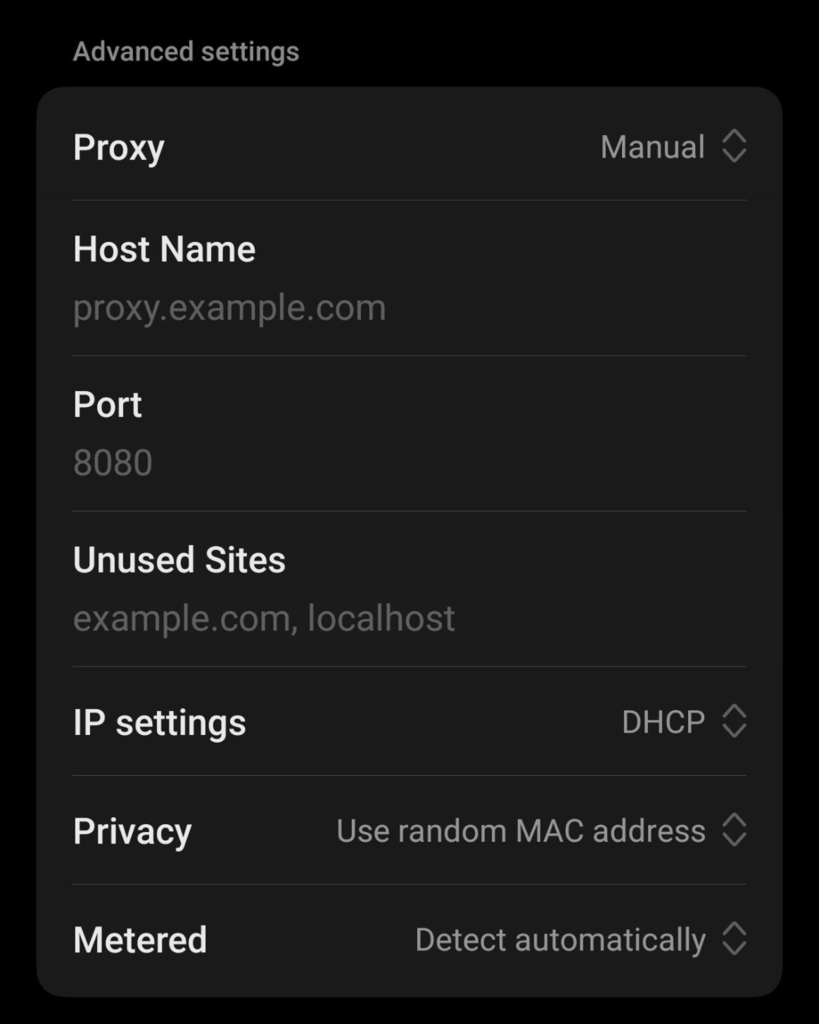
Step 6: Save and test the connection
Save the network settings and open a browser. Use an IP checker to confirm whether your visible IP has changed. If the IP did not change, check the hostname and port again.
How to Disable Proxy on Android Wi-Fi
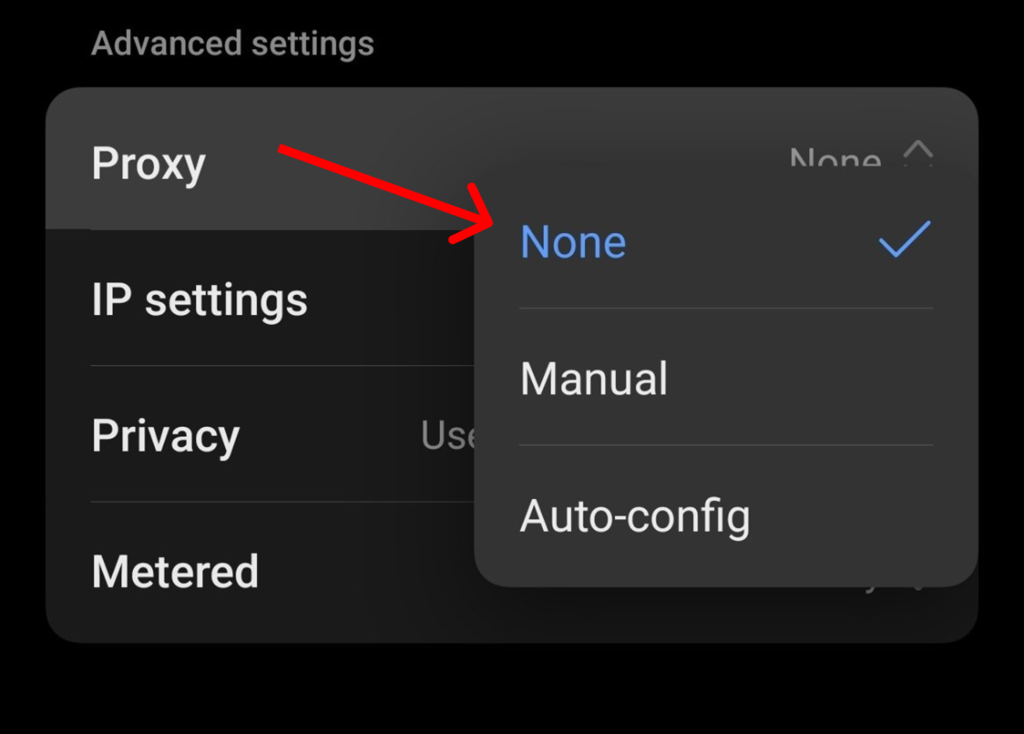
To turn the proxy off, open the same Wi-Fi network settings, go to Advanced options as shown in the steps 1-3, and change Proxy from Manual or Auto-config back to None. Save the settings and reconnect if needed.
Android Wi-Fi Proxy Limitations
Android’s native Wi-Fi proxy setup is useful, but it has real limits.
- It usually works per Wi-Fi network, not as a full Android system proxy.
- It may not apply to mobile data.
- Some apps ignore Android system proxy settings.
- Username and password authentication can be awkward or unsupported in Wi-Fi settings.
- SOCKS5 support is limited through native Wi-Fi settings.
For basic browser checks, native settings are fine. For serious Android proxy workflows, use a proxy manager app.
How to Set Up Android Proxies With Shadowrocket
Shadowrocket is a proxy manager for mobile devices. It lets you import proxies, add configurations manually, set custom rules, and route mobile traffic through a selected proxy.
Step 1: Install Shadowrocket
Download Shadowrocket on your device. Depending on your device and region, you may find it in the Google Play.
Step 2: Generate and copy NodeMaven proxy details
Go to the Proxy section in your dashboard and choose your proxy type, location settings, session type, and protocol.
Copy your Proxy username, Proxy password, Host and Port.
Sticky sessions are often best for stable Android browsing and account workflows.
Use residential, mobile, and ISP proxies with sticky sessions, SOCKS5 support, and pre-filtered IPs. Start with 750MB for just $3.50
Step 3: Add NodeMaven proxy in Shadowrocket
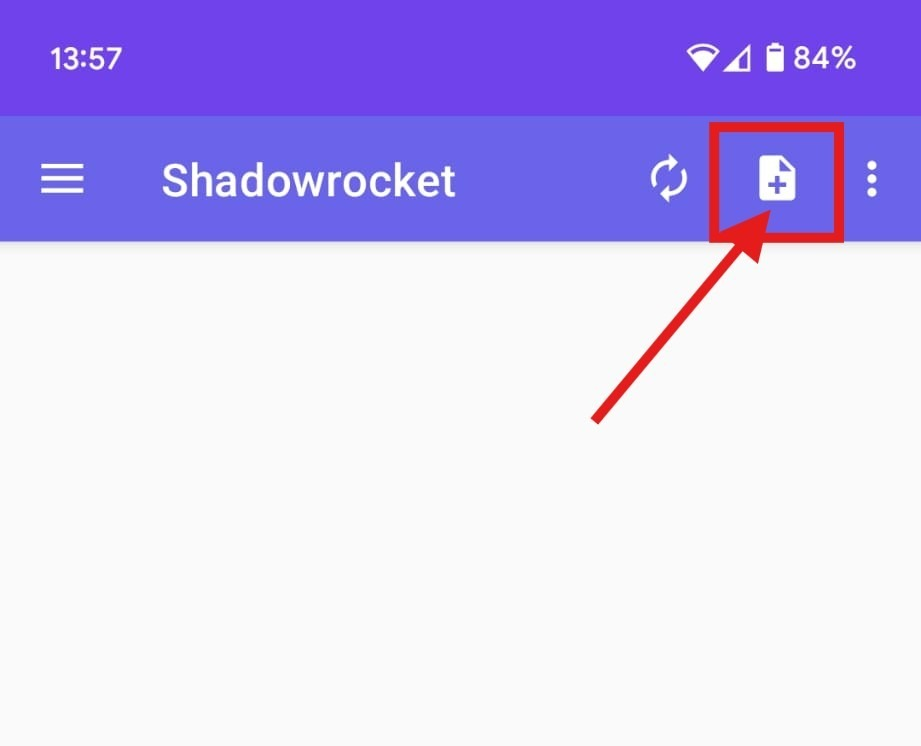
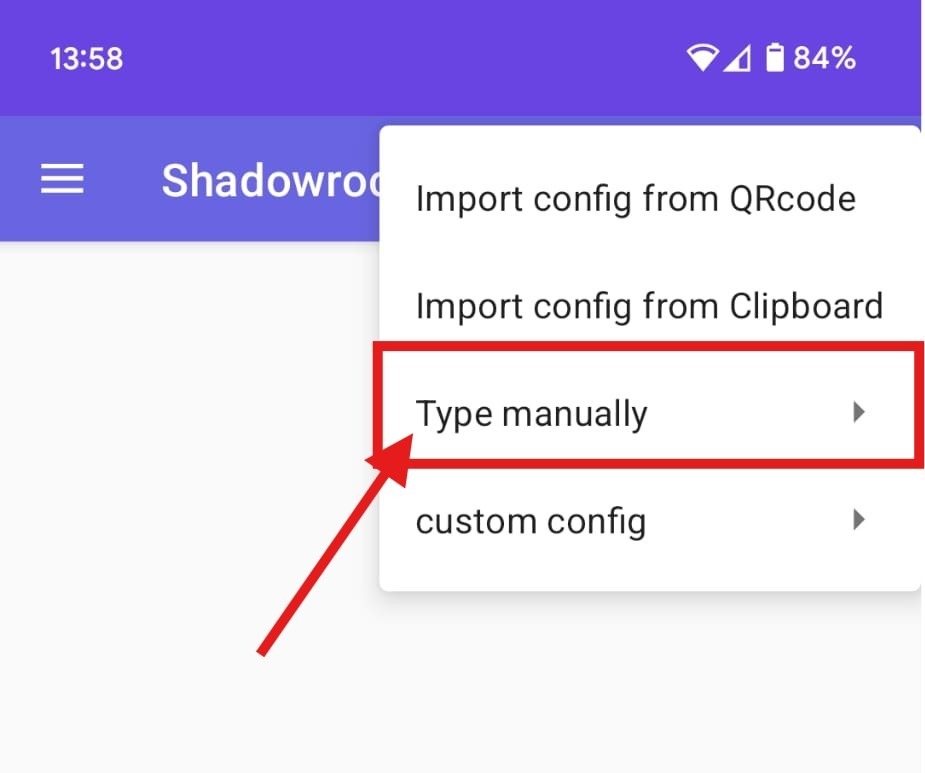
Open Shadowrocket and tap Add Config. Choose Type Manually, then select SOCKS5 as your proxy type.
Step 4: Fill in the proxy fields
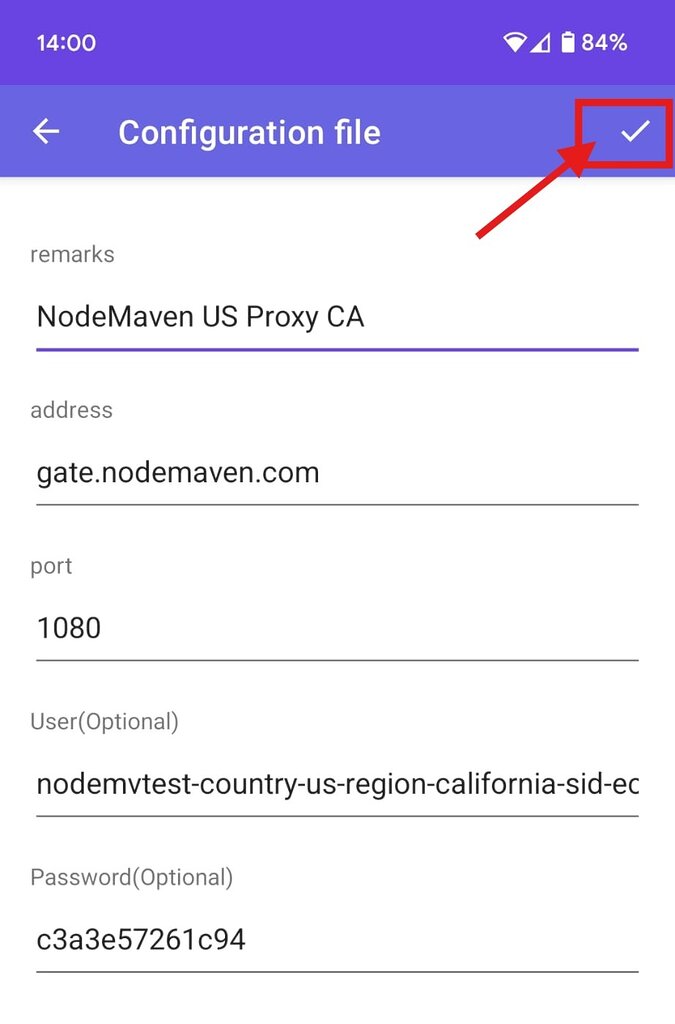
- Address: gate.nodemaven.com
- Port: any value from 1080 to 2080
- Username: your NodeMaven proxy username
- Password: your NodeMaven proxy password
Tap Save to store the profile.
Step 5: Activate the proxy profile
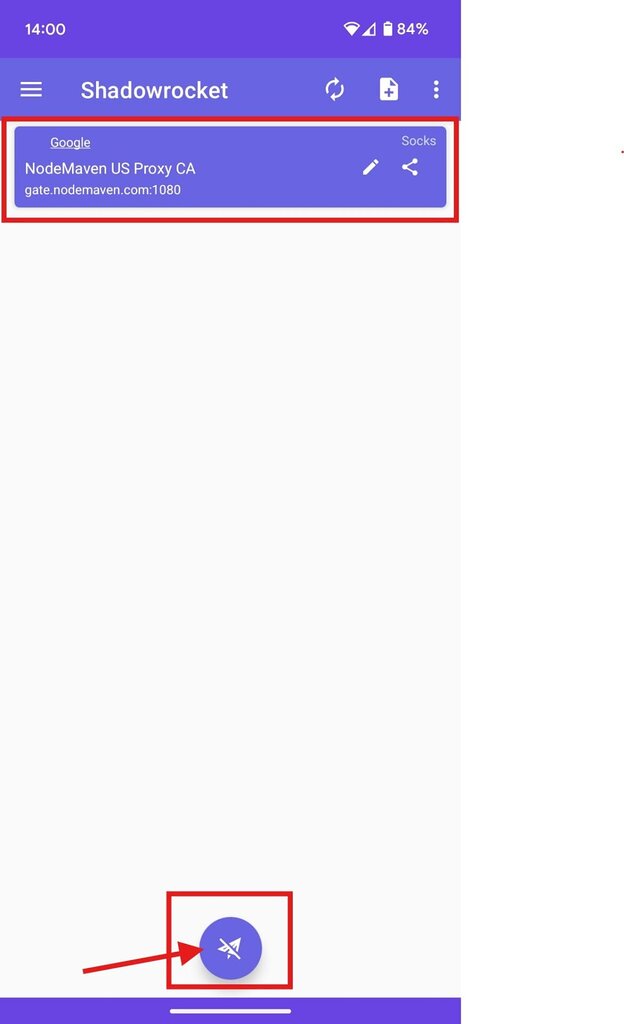
Your new NodeMaven profile will appear on the Shadowrocket dashboard. Tap the paper plane icon to activate it, then check your IP location before starting work.
How to Set Up Android Proxies With Happ
Happ is a proxy utility app available for iOS and Android. It supports manual SOCKS proxy configuration for mobile workflows and proxy-based connections.
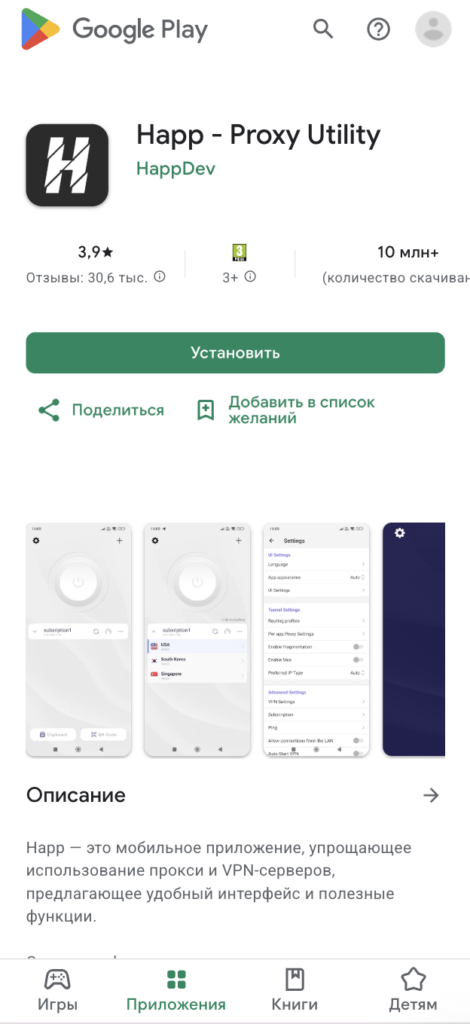
Step 1: Install Happ
Download Happ – Proxy Utility from Google Play. In some regions, it may not be available, so you may need to adjust your store region settings.
Step 2: Generate a Happ SOCKS5 proxy in NodeMaven
Open the NodeMaven dashboard and create a proxy for Happ using SOCKS5. Choose Residential, Mobile, or ISP depending on your workflow.
Use residential, mobile, and ISP proxies with sticky sessions, SOCKS5 support, and pre-filtered IPs. Start with 750MB for just $3.50
Step 3: Open Happ proxy configuration
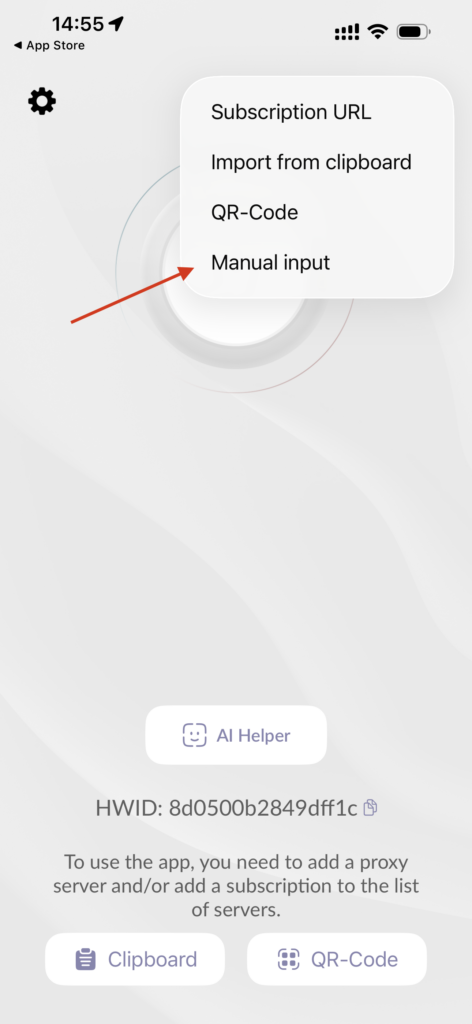
Open Happ, tap the + button, and select Manual input.
Step 4: Add your Happ proxy server details
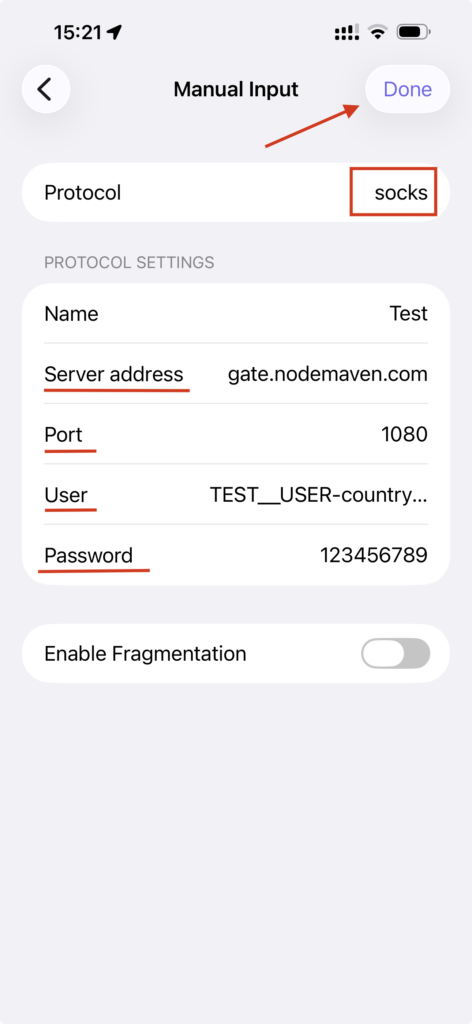
- Server address: gate.nodemaven.com
- Port: 1080
- Username: your proxy username
- Password: your proxy password
Tap Done to save the settings.
Step 5: Connect to the Happ proxy
Tap the Power button inside Happ to activate the proxy connection. If everything is configured correctly, your mobile traffic will run through the NodeMaven proxy server with stable sessions and consistent performance.
Best Proxy Type for Android
Residential proxies
Residential proxies are the safest default for most Android workflows. They use real household IPs, which makes browsing, app testing, account workflows, and location-based research look more natural.
With NodeMaven, residential proxies are built around clean, pre-filtered IPs and stable sessions, so you get consistent performance without relying on noisy shared IP pools.
Mobile proxies
Mobile proxies are useful when your workflow is mobile-first and carrier-like IP behavior matters. They are a strong fit for Android app checks, browsing, mobile content testing, and sessions where a mobile network profile is important.
NodeMaven gives access to residential and mobile proxies in one setup, making it easier to match the proxy type to the task instead of forcing every workflow through the same IP pool.
ISP proxies
ISP proxies are useful when you need speed, stability, and residential-like legitimacy. They combine fast infrastructure with ISP-assigned IPs, which helps when Android workflows need longer sessions and consistent performance.
For tasks that depend on a stable connection, NodeMaven ISP proxies support steady sessions, TCP and UDP traffic, and unlimited bandwidth.
Why Use NodeMaven Proxies for Android?
Android proxy setup is only one part of the workflow. The proxy quality behind the setup matters just as much.
NodeMaven proxies are built around clean IPs, stable sessions, and consistent performance. Instead of focusing only on pool size, NodeMaven prioritizes IP quality so Android workflows are less likely to run into unstable connections or poor IP reputation.
- Residential, mobile, and ISP proxies from $2.20/GB and $2.33/IP/30 days
- Clean, pre-filtered IPs
- Sticky sessions for stable Android workflows
- SOCKS5 support for Shadowrocket and Happ
- Location targeting for regional testing and research
- Consistent performance designed for reliability at scale
- Quality guarantee and eligible cashback options
Use residential, mobile, and ISP proxies with sticky sessions, SOCKS5 support, and pre-filtered IPs. Start with 750MB for just $3.50
Common Android Proxy Problems and Fixes
The proxy works on Wi-Fi but not on mobile data
Android’s built-in proxy settings usually apply to Wi-Fi networks, not mobile data. Use a proxy manager app if you need broader routing.
An app ignores the Android proxy settings
Some apps do not follow system proxy settings. Try a proxy manager that can route traffic through a selected proxy profile.
The IP location did not change
Check that the proxy profile is active, the hostname is correct, and the port matches your dashboard.
The proxy asks for authentication
Use the username and password from your NodeMaven dashboard. If Android Wi-Fi settings do not handle authentication properly, use Shadowrocket or Happ.
ERR_TUNNEL_CONNECTION_FAILED appears
This error usually means the browser or app tried to connect through a proxy or VPN, but the tunnel could not be created.
The most common proxy-related causes are simple:
- The proxy server is temporarily unavailable. Turn the proxy profile off and on again, then retry after a short pause.
- The proxy authentication is wrong. Check the username, password, port, and protocol in your NodeMaven dashboard. If you use IP whitelisting, make sure the correct IP is whitelisted.
If the error continues, create a fresh proxy profile in Shadowrocket or Happ and verify the connection with an IP checker before opening the app or website again.
Use residential, mobile, and ISP proxies with sticky sessions, SOCKS5 support, and pre-filtered IPs. Start with 750MB for just $3.50