
How to Set Up a Proxy on Windows 11: Step-by-Step Guide


To set up a proxy on Windows 11, open Settings > Network & internet > Proxy,选择 设置 beside Manual proxy setup, and enter the server address and port supplied by your proxy provider. Save the configuration, authenticate in your browser, and check the new connection before using it.
If you use Windows for 网络爬虫, 浏览器自动化,或 多账户管理, a low-quality or overused IP can lead to failed requests, CAPTCHAs, and interrupted sessions. NodeMaven filters IPs before assignment and offers rotating, sticky, and private static proxies, so you can choose a reliable connection without repeatedly replacing and reconfiguring the proxy.
Windows 11’s built-in settings work with NodeMaven HTTP proxies in browsers such as Chrome and Edge. For SOCKS5 or applications that ignore the system proxy, you can connect the same NodeMaven credentials through Proxifier.

Choose your location and session type, then copy the credentials directly from the NodeMaven dashboard. Try residential and mobile proxies with 750 MB 仅需 $3.50, or get a static ISP proxy with unlimited traffic from $2.33/IP for 30 days.
Which NodeMaven proxy should you choose for Windows 11?
Choose the product around how long you need to keep the IP and how often its location should change.
| Windows workflow | Recommended NodeMaven proxy | 你能获得什么 |
| Regular account access or a browser profile that should keep one address | ISP 代理 | A private static ISP IP, unlimited traffic, HTTP or SOCKS5, and quality verification before assignment |
| Localized browsing, public data collection, or switching between markets | 住宅代理 | Access to 30M+ filtered IPs across 190+ countries, precise targeting, and rotating or sticky sessions |
| Testing through 5G and LTE networks | 移动代理 | Mobile-network exits with location controls and sticky sessions |
Residential and mobile plans share one traffic balance and include up to 10% cashback on used traffic. If you want to test the Windows setup before committing to a larger plan, start with the NodeMaven trial.
What do you need before setting up a Windows 11 proxy?
Have the following details ready:
- Proxy server or hostname, such as the gateway shown in your dashboard
- Port number for the selected protocol
- 用户名和密码 for proxy authentication
- Required country or region
- HTTP proxy credentials for the built-in Windows method
Do not assume that every proxy uses port 8080 or 1080. Copy the port displayed with your own credentials. A correct host with the wrong port will not connect.
How to set up a proxy on Windows 11 manually
The following setup uses Windows 11’s built-in proxy controls. Microsoft documents the same path in its official Windows proxy server guide.
Step 1. Get your proxy details from the NodeMaven dashboard
登录到 NodeMaven 仪表板 and purchase or configure the proxy selected above. The dashboard builds the connection details for you, including the correct gateway, port, and authentication values.
Choose your location and session type, then copy the credentials directly from the NodeMaven dashboard. Try residential and mobile proxies with 750 MB 仅需 $3.50, or get a static ISP proxy with unlimited traffic from $2.33/IP for 30 days.
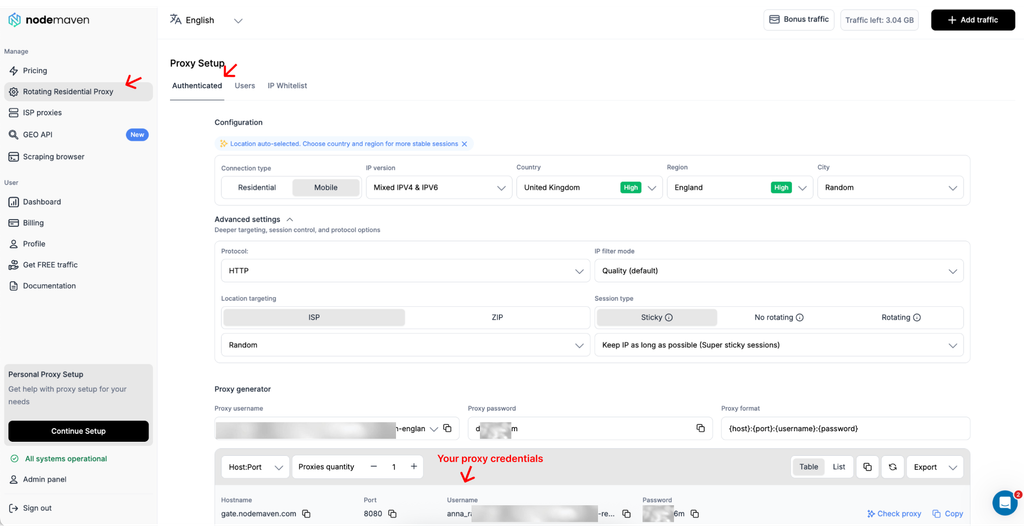
For residential or mobile proxies:
- 打开 轮换住宅代理.
- Select Residential or Mobile.
- Choose the country and any available location settings you need.
- Choose a sticky session if the IP should stay unchanged while you work.
- 选择 HTTP protocol for the built-in Windows setup. It can carry ordinary browser requests, including connections to HTTPS websites.
- Generate and copy the server, port, username, and password.
For an ISP proxy:
- 打开 ISP Proxies section.
- Select the country and number of IPs.
- Choose the HTTP option during purchase if you plan to use Windows Settings.
- After purchase, open the proxy details and copy the server, port, username, and password.
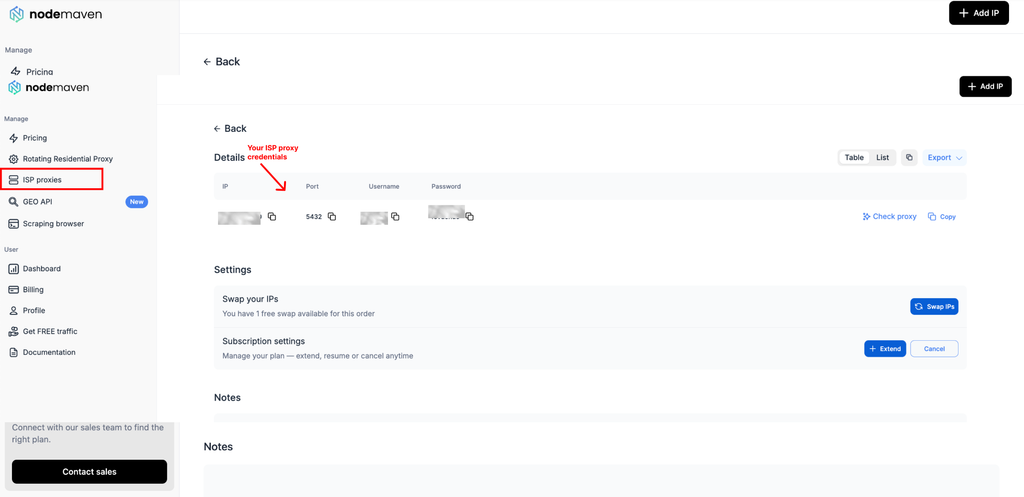
Copy the complete username. NodeMaven can encode the selected country, session, and filtering options in it, so removing part of the value can change the connection or cause authentication to fail.
Step 2. Open the Windows 11 proxy settings
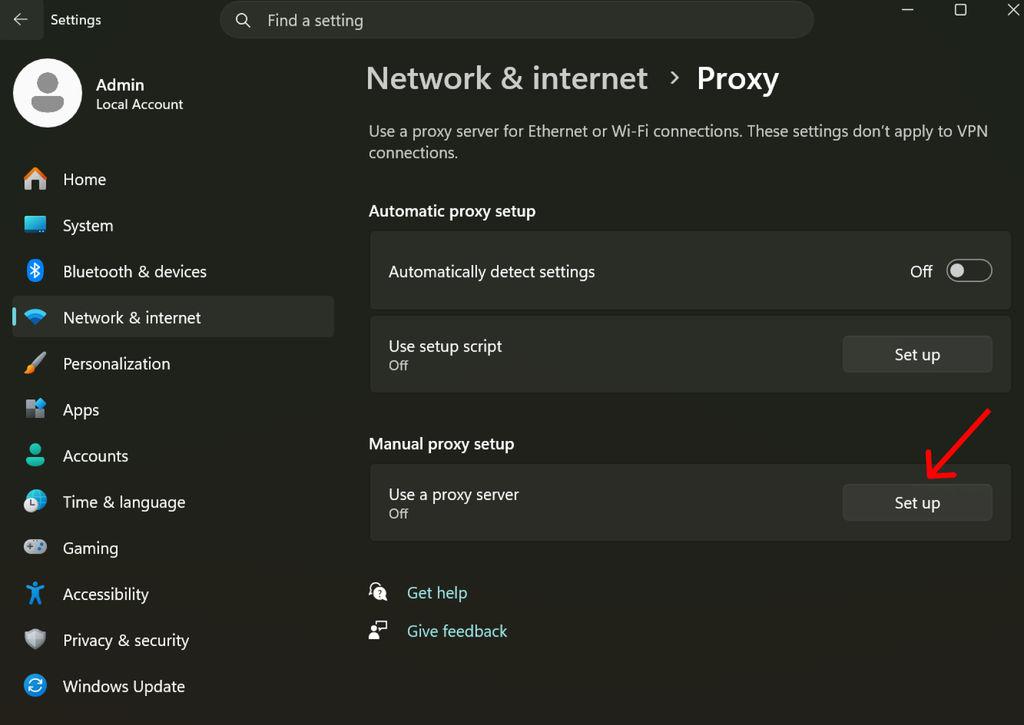
- 按下 Windows + I 以打开设置。
- 选择 Network & internet 位于左侧边栏。
- 打开 代理.
- 查找 手动代理设置.
- 选择 设置 beside 使用代理服务器.
You can also open Start and search for Change proxy settings to reach the same page.
Step 3. Enter the proxy server and port
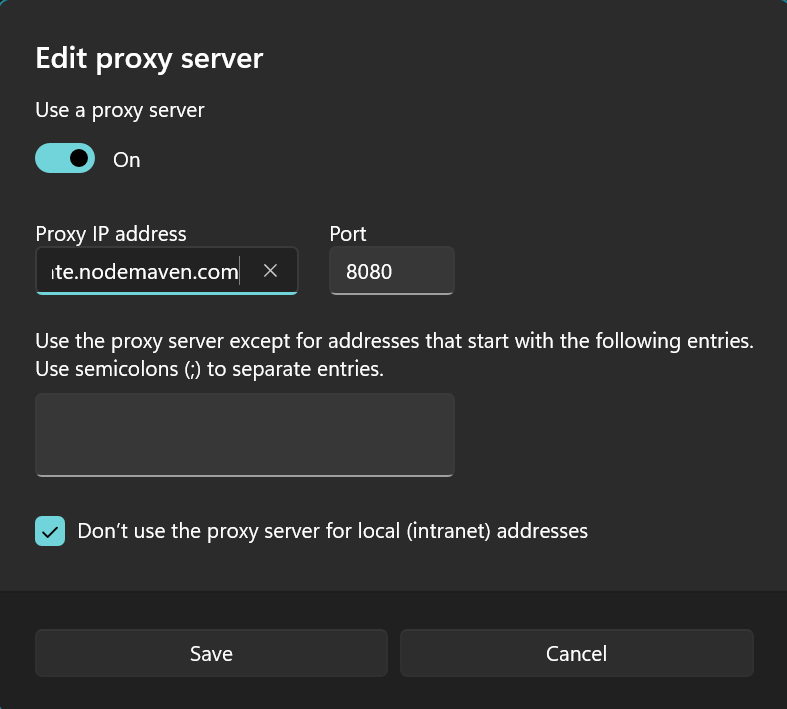
开启 使用代理服务器, then fill in these fields:
- 代理 IP 地址: paste the server address or hostname from NodeMaven
- 端口: paste the matching port from the dashboard
Enter the hostname without a protocol prefix. For example, use gate.nodemaven.com, not http://gate.nodemaven.com.
Windows also lets you add addresses that should bypass the proxy. Separate entries with semicolons. For example:
localhost;*.company.local;192.168.*
启用 Don’t use the proxy server for local (intranet) addresses if local printers, routers, or internal company pages should keep using the direct network. Microsoft recommends this setting unless your organization routes its intranet through the proxy.
选择 保存.
Step 4. Authenticate the proxy in your browser
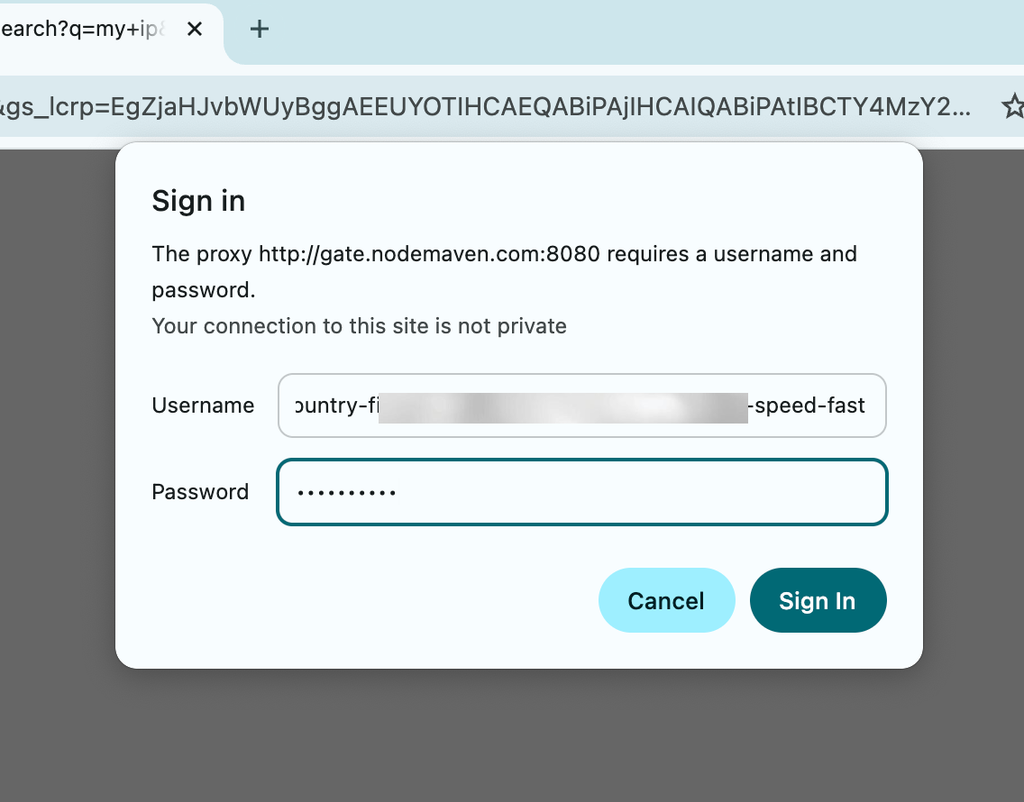
Open Edge or Chrome and load a new website. If the proxy uses username and password authentication, the browser should display a sign-in window. Paste the complete NodeMaven username and password, then submit it.
Windows Settings does not include separate username and password boxes. Chromium’s 代理文档 explains that Chrome handles proxy authentication through its normal credential flow instead of reading credentials embedded in the system setting.
If the prompt keeps returning, check for:
- A missing character or extra space in the username or password
- A port that belongs to a different protocol
- An expired or inactive proxy order
- Another VPN, browser extension, or proxy client changing the route
Step 5. Verify the IP and connection path
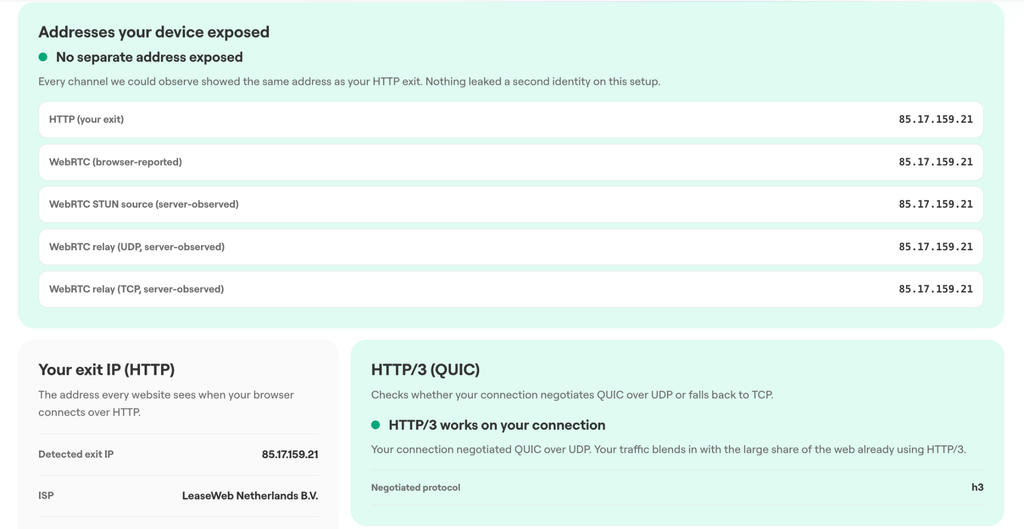
Do not stop after a page loads. Open the NodeMaven Connection Checker in the same browser and review the results.
请确认:
- 该 HTTP 出口 IP matches the intended proxy
- The reported country and ISP match the selected location
- WebRTC does not expose an unexpected second public address
- HTTP/3 behavior is recorded as expected for the current setup
The Connection Checker tests more than a basic IP 查询. It compares addresses visible through HTTP and WebRTC channels, including server-observed STUN and relay checks. This can reveal a split route that a standard “what is my IP” page would miss.
If the original public IP appears through WebRTC, read our WebRTC leak guide before using the browser profile for production work.
How to set up a SOCKS5 proxy on Windows 11
The modern Windows 11 proxy screen does not let you select SOCKS5 or enter SOCKS5 authentication details. Windows still has older proxy controls under Internet Options, but their SOCKS behavior and application support are inconsistent for authenticated SOCKS5 services.
For a NodeMaven SOCKS5 proxy, the cleaner approach is Proxifier. It provides separate fields for the server, port, username, password, and protocol, then lets you route selected applications through the proxy.
Set up NodeMaven SOCKS5 in Proxifier
- In NodeMaven, generate a residential or mobile endpoint with SOCKS5, or choose SOCKS5 when purchasing an ISP proxy.
- Install and open Proxifier.
- 前往 Profile > Proxy Servers.
- 选择 添加.
- Enter the NodeMaven server and port.
- 选择 SOCKS Version 5.
- Enable authentication and enter the username and password.
- Run Proxifier’s connection check.
- Create a Proxification Rule for the browser or application that should use the proxy.
This route is also better when you want one Windows application to use the proxy while the rest keep their normal connection. Our SOCKS5 配置指南 covers the protocol and other supported devices in more detail.
How to use NodeMaven proxies in code on Windows
Developers don’t need to change the Windows proxy settings for an application that already controls its own HTTP client or browser. NodeMaven provides official Python, Rust, and Go SDKs for its residential and mobile proxy gateway.
The SDKs build and validate the proxy username before a request leaves the machine. They catch unsupported parameters and typing mistakes that the gateway could otherwise ignore, check the proxy connection, and provide clients for account functions such as usage statistics, location lookup, sub-users, and IP whitelisting. Your existing HTTP client still handles requests, browser sessions, retries, and connection pooling.
The SDKs and other developer projects are available on NodeMaven’s GitHub. We also published a connection checker, Google Browser Scraper, MCP server, and proxy benchmark.
How to use automatic proxy setup in Windows 11
Automatic setup is mainly used by workplaces, schools, and managed networks. Use it only when an administrator or provider gives you a setup script address.
- 打开 Settings > Network & internet > Proxy.
- 低于 Automatic proxy setup,选择 设置 beside Use setup script.
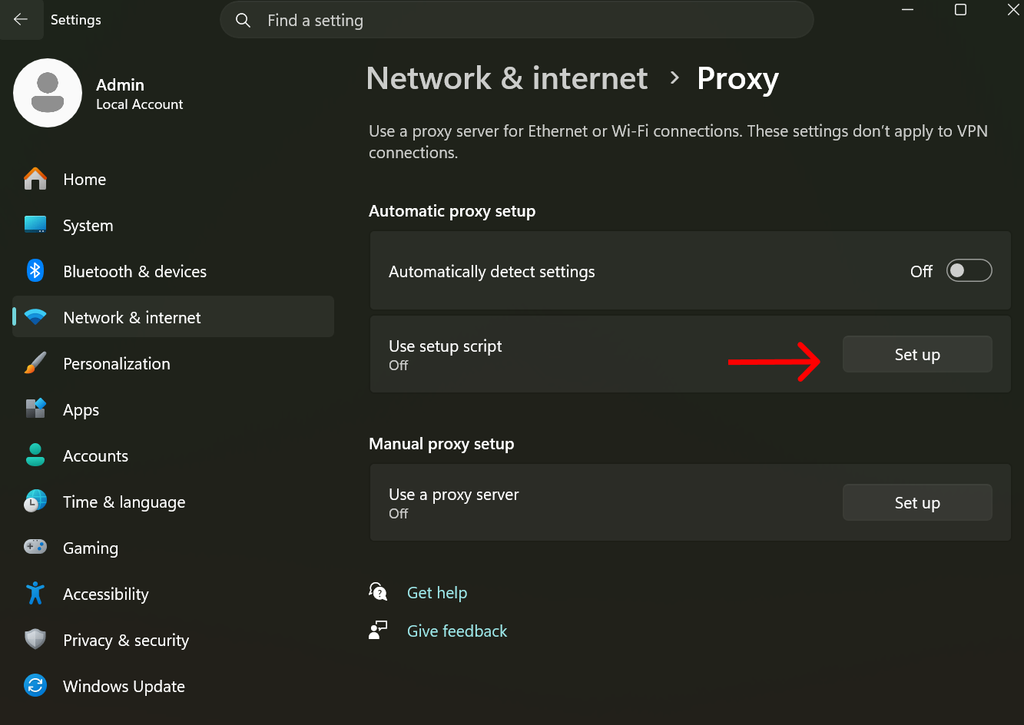
- 开启 Use setup script.
- Paste the script address.
- 选择 保存.
该 Automatically detect settings option lets Windows look for a configuration on the current network. It does not discover paid proxy credentials from NodeMaven or another provider.
Avoid enabling a setup script and a manual proxy at the same time unless your network administrator specifically requires both. Competing settings make connection errors harder to trace.
Common Windows 11 proxy problems and fixes
| 问题 | 可能的原因 | 应该怎么做 |
| Browser shows “Unable to connect to the proxy server” | Incorrect server, port, or inactive order | Copy the host and port again from the NodeMaven dashboard and confirm the proxy is active |
| Authentication prompt keeps returning | Incorrect credentials or protocol mismatch | Paste the full username and password, remove extra spaces, and verify that the selected port belongs to HTTP |
| Connection Checker still shows the original HTTP IP | Manual proxy is off, another setting overrides it, or the app ignores Windows settings | Reopen the proxy page, disable competing VPNs or extensions, restart the app, and test again |
| Browser works but another application connects directly | The application does not use the Windows system proxy | Route that program through Proxifier or use its own proxy settings |
| Local printer or company page stops loading | Local address is being sent to the proxy | Enable the intranet bypass option or add the local address to the exception list |
| SOCKS5 does not work in Windows Settings | The modern proxy screen does not provide a reliable authenticated SOCKS5 setup | Configure the NodeMaven SOCKS5 endpoint in Proxifier |
| Some websites load but the session changes unexpectedly | A rotating session was used where a stable route was needed | Generate a sticky residential session or use a static ISP proxy |
For a broader diagnostic workflow, follow our step-by-step proxy testing guide.
How to turn off a proxy in Windows 11
- 打开 Settings > Network & internet > Proxy.
- 低于 手动代理设置,选择 设置.
- 关闭 使用代理服务器.
- 选择 保存.
If you enabled a setup script, turn it off separately under Automatic proxy setup. Close and reopen affected applications so they pick up the new network settings.
Why use NodeMaven on Windows 11?
For regular Windows use, the IP should remain available, match the selected location, and stay consistent for as long as the workflow requires.
NodeMaven 提供:
- Filtered residential and mobile IPs. The IP Quality Filter checks addresses before assignment to reduce the use of unreliable or previously flagged proxies.
- Rotating and sticky sessions. Rotate IPs between requests or keep the same address during a longer browser session.
- Location targeting. Select a country and, where available, a region, city, ZIP code, or ISP.
- Traffic rollover. Unused residential and mobile traffic remains available while the subscription stays active.
- Free connection testing. 该 连接检测器 verifies the exit IP, WebRTC addresses, and HTTP/3 behavior.
For workflows that need one IP over a longer period, NodeMaven ISP 代理 提供 a dedicated static address with unlimited traffic. Auto-renewal can keep the same IP attached to the setup, while the quality guarantee covers replacement or refund under the applicable terms.
This gives you a Windows proxy configuration you can keep using instead of repeatedly replacing public or heavily shared endpoints. See our ISP vs residential proxy guide to compare the two options.
Choose your location and session type, then copy the credentials directly from the NodeMaven dashboard. Try residential and mobile proxies with 750 MB 仅需 $3.50, or get a static ISP proxy with unlimited traffic from $2.33/IP for 30 days.


