How to Use Residential Proxies: Complete NodeMaven Setup & Best Practices Guide

If you’re searching for how to use residential proxies, then this step-by-step guide will help you get started with NodeMaven.
Whether you’re a beginner or power user, we’ll show you how to configure your proxy setup, avoid mistakes, and integrate it with tools like Multilogin, Playwright, and Puppeteer.
How to Use Residential Proxies with NodeMaven
Before you begin using residential proxies, you’ll need to:
1. Log in to your NodeMaven account
→ Don’t have one yet? Create an account — it only takes a minute.
2. Purchase traffic or activate a trial plan
→ Start with 1GB for just €3.99 to test the full feature set.
- The manual dashboard setup (for full control and customization)
- The Personal Proxy Setup tool (fast and beginner-friendly)
Let’s walk through both options below.
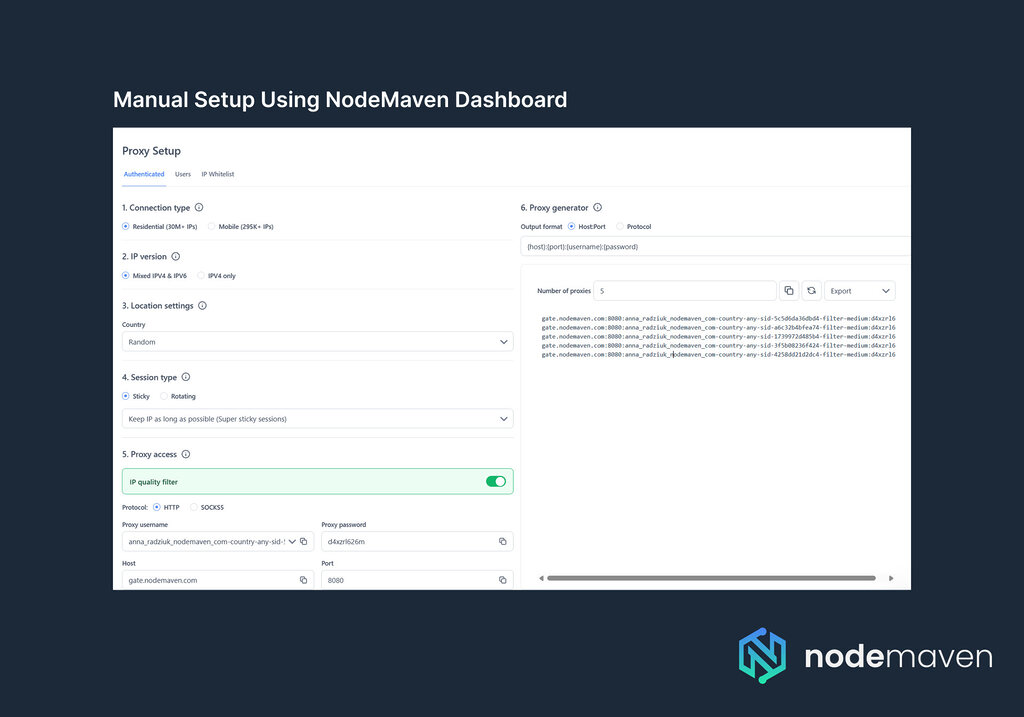
Step-By-Step Manual Setup Using NodeMaven Dashboard For Full Control
Whether you’re a beginner or a seasoned proxy user, NodeMaven makes it easy to set up high-quality residential proxies through its intuitive dashboard.
Here’s a step-by-step guide to help you get started.
1. Select the Setup Method: Authenticated, Users, or IP Whitelist
In the Proxy Setup section, you’ll see three authentication options. Choose the one that best fits your workflow:
- Authenticated: Use a proxy username and password. Works with most tools and gives you full control — ideal for general use.
- Users: Create separate sub-accounts with individual credentials. For example, it is the best choice for teams managing access across multiple users.
- IP Whitelist: Authorize access by your IP address, no login needed. In addition, it is great for servers or tools that don’t support authentication.
Tip: If unsure, start with Authenticated — it’s the most versatile option.
2. Understand Your Proxy Credentials
In the Proxy Setup section, you’ll find your Proxy Username and Password.
- These credentials grant access to the proxy network — keep them secure.
- Your username is dynamic and will change based on the configuration options you select (IP type, IP version, location, session type, etc.).
- Your password remains the same.
3. Choose Your Connection Type
Select either:
- Residential (30M+ IPs)
- Mobile (295K+ IPs)
Note: Choosing one will automatically update your proxy username with the correct parameters.
4. Select IP Version
Choose between:
- Mixed IPv4 & IPv6 (broader IP pool)
- IPv4 only (for stricter compatibility)
5. Set a Target Location
Choose a country, region, or city — or leave it as Random to receive IPs from anywhere. Also you can also target by ISP in advanced settings.
Note: Changing location settings updates your proxy username in real-time.
6. Pick a Session Type
Choose between:
- Sticky: Maintain the same IP for up to 24 hours. You can customize session length by entering a value in seconds (e.g., 10800 = 3 hours).
- Rotating: Receive a new IP with each request.
7. Enable the IP Quality Filter and Choose Protocol
- IP Quality Filter: Ensures you’re assigned high-reputation, undetectable IPs.
- Protocol: Choose between HTTP or SOCKS5 depending on your use case.
Learn more about IP filtering and proxy protocols
8. Generate Your Proxy List
- Choose the output format:
- Host:Port or Protocol (e.g., http://username:password@host:port)
- Enter the number of proxies you need.
- Copy the list or export it as a CSV/TXT file.
9. Start Using Your Proxies
You can now integrate the proxy list with your preferred tool or script.
Note: NodeMaven supports tools like Multilogin, AdsPower, Dolphin Anty, and more.
Here’s a sample proxy string for use with cURL:
curl -k -x http://PROXYUSER-country-us-sid-bffe3f4943264-filter-medium:[email protected]:8080 -L https://nodemaven.comReplace PROXYUSER and PASSWORD with your credentials.
Quick Setup with NodeMaven’s Personal Proxy Setup Tool
If you want a faster and simplified experience, try the Personal Proxy Setup tool — as it’s perfect for new users.
Note: You need available traffic or an active plan in your account to use this feature.
How it works:
- Go to your dashboard → Scroll to Personal Proxy Setup → Click Start Setup
- Step 1: Choose how you plan to use proxies (e.g. scraping, account management)
- Step 2: Select the platforms (e.g. Google, Facebook, eBay) or choose “Other”
- Step 3: Choose locations — select countries, regions, cities and number of IPs
- Step 4: Choose the software you’ll use (e.g. Antidetect browser or Custom)
- Step 5: Select your protocol and output format. You’ll get your customized proxy list + clear instructions for integration based on your selected tool.
That’s it — you’re now ready to use high-quality NodeMaven residential proxies in under 5 minutes.
Using Proxies with Anti-Detect Browsers, Automation Tools and APIs
Once your proxy settings are ready, integrating them into your favorite tools is simple.
Whether you’re working with anti-detect browsers like Multilogin, AdsPower, or Dolphin Anty, automation frameworks like Playwright or Puppeteer, or using our API, NodeMaven supports it all.
Tip: If you’re unsure where to start, the Personal Proxy Setup tool in your dashboard helps generate ready-to-use configurations and instructions tailored to your specific case.
For everything else, we provide step-by-step integration guides and detailed documentation for a wide range of browsers, automation tools, and custom software on our Integrations page, in the NodeMaven Help Center and in our API Access Guide.
Tip: Have a unique use case or need help with integration? Our customer support team is always ready to assist — just reach out anytime.
Using NodeMaven’s IP Quality Filter to Boost Performance
NodeMaven’s IP Quality Filter automatically blocks low-quality and suspicious IP addresses — helping you avoid bans, CAPTCHAs, fraud, and slowdowns.
It analyzes each IP based on reputation, behavior history, and connection type before assigning it to you.
By using only clean, trusted IPs, you get:
- Fewer blocks and retries during automation or scraping
- Better stability and longer sticky sessions (up to 24 hours+)
- Safer, faster, and more reliable performance across all use cases
This smart filtering is built into every residential and mobile proxy you use at NodeMaven — no extra setup required.
Best Practices for Residential Proxy Usage and Common Mistakes to Avoid
Using residential proxies effectively requires more than just connecting an IP — it’s about smart configuration, consistent behavior, and avoiding detection.
- Rotate IPs Wisely to Avoid Bans: Reusing the same IP too long or across accounts can trigger bans. Consequently, you should use rotating proxies for scraping and sticky sessions for logins — NodeMaven supports both.
- Monitor Success Rates and Avoid Suspicious Behavior: High failure rates, CAPTCHAs, or bans? Slow down, randomize actions, and simulate real users to avoid detection.
- Use Targeting (City, ISP) for More Accurate Results: Target by country, city, or ISP to make your proxies look more authentic. NodeMaven’s dashboard makes it easy.
- Ignoring IP Reputation and Quality: Low-quality IPs = instant blocks. NodeMaven’s IP Quality Filter gives you 95%+ clean IPs, screened in real time.
- Not Configuring Headers or Fingerprints Properly: Even with residential IPs, mismatched fingerprints can expose you. In particular, keep headers, languages, and time zones consistent with your proxy.
Tip: Want to go deeper? Check out our free webinar: Understanding Browser Fingerprinting: Best Practices for Security
Key Benefits and Use Cases of Using Residential Proxies
- Higher anonymity and trust: Residential IPs come from real devices, thus making your traffic look like it’s coming from a regular user. So this helps avoid bans, CAPTCHAs, and detection during sensitive tasks.
- Bypass geo-restrictions and anti-bot systems: Get IPs from specific countries, cities, or even ISPs to access region-locked content and bypass anti-bot filters without triggering alerts.
- Perfect for scraping, automation, multi-accounting, and ad verification: Use residential proxies to collect data, manage accounts, verify ads, or run automated processes at scale — all while maintaining stability and avoiding bans.
- Better protection against fraud and blacklisting: With NodeMaven’s built-in IP Quality Filter, you get access to clean and high-reputation IPs — as a result reducing your risk of getting flagged or blocked.
Why Choose NodeMaven for Residential Proxies?
If you’re looking for high-performance residential proxies that combine speed, flexibility, and reliability, NodeMaven offers one of the most advanced solutions on the market.
Here’s what sets us apart:
- 95%+ clean IPs, screened in real time: Our proprietary IP Quality Filter ensures you only get high-trust and undetectable IPs — thus reducing the chances of bans, CAPTCHAs, and failed requests.
- Seamless proxy control: Configure everything — from proxy type and IP version to targeting and session duration — through a simple, intuitive dashboard.
- Unified access to mobile + residential proxy pool: No need to manage separate services, because you can easily switch between mobile and residential proxies from a single account and pricing structure.
- Flexible, transparent pricing: Pay only for the traffic you use. Whether you’re just testing or scaling aggressively, our plans adapt to your workflow — with no hidden fees.
NodeMaven gives you full control, cleaner IPs, and better results — without overcomplicating your setup or overcharging your budget.


